
Tools and Materials
Tools
Items may be Special Order in some stores. Product costs, availability and item numbers may vary online or by market. Paint colors may vary slightly from those shown. Availability varies by market for lumber species and sizes.
Make a Table Base
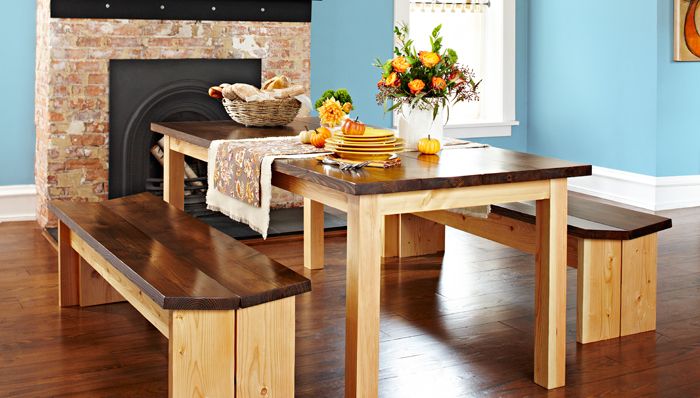
Are you ready for a new dining set? With a few tools, time and effort, you can create this wood dining set with matching benches. Let's start with the table base.
If you'd prefer to purchase a set, Lowe's has thousands of dining tables, chairs and benches that you can buy online and have delivered to your home.
Step 1: Cut the Table Legs
Start by cutting four 4-inch-by-4-inch blanks for the legs (A) to a rough length of 29-1/2-inches. Use a table saw to trim the leg blanks to final width and thickness. Use a miter saw to trim the parts to the final length (refer to the Harvest Table and Benches Project Diagram).
Step 2: Cut the Remaining Table Base Parts
For the remaining table base parts, cut the long aprons (B), short aprons (C), corner braces (D) and stretchers (E) to width and length. Cut a 45-degree miter on both ends of the corner braces (as shown in the Project Diagram) and drill a 1/4-inch hole centered on the face of each brace.
Step 3: Prepare the Pocket Holes
Drill holes for the pocket hole screws in the long and short aprons and the stretchers (Project Diagram Drawing 2). You'll need to set your pocket hole jigsaw to predrill material that's 1 inch thick. Sand all of the parts with 220-grit sandpaper.
Step 4: Begin Building the Table Base


Begin building the base by attaching the long and short aprons to the legs using wood glue and 2-inch pocket hole screws (refer to the Project Diagram). Inset the aprons 1/4 inch from the outside face of the legs.
Step 5: Attach the Corner Bases
Glue the corner braces into each corner of the table. To reinforce them, drive 2-inch pocket-hole screws through the blocks into the aprons without making pocket holes.
Check out our Screws Buying Guide to learn more about various types of screws you can use for your farmhouse table plans.
Step 6: Attach the Corner Joints and Bases

Use a 3/16-inch drill bit to drill a pilot hole into the corner of the leg, and center the bit in the 1/4-inch hole you drilled in the corner block. To reinforce the corner joint, drive a 1/4-inch lag screw through the brace into the leg.
Step 7: Complete the Table Base
To complete the table base assembly, add the stretchers between the long aprons with wood glue and pocket hole screws.
DIY Tabletop and Finish
Learn how to make the cut the top slats and apply the stain.
Step 1: Cut the Top Slats
Prepare the four 2-inch-by-10-inch boards for the top slats (F). Cut the planks to rough length, trim to width and then cut to the final length. Sand the slats with 220-grit sandpaper.
Step 2: Finish the Slats
To start the finishing process, ease all of the hard edges of the top and table base with the 220-grit sandpaper for a smooth feel. Then wipe down the wood with a cleaning cloth.
Apply a wood conditioner to the slats. Follow the manufacturer's instructions to prevent the stain from turning blotchy in the soft wood. Apply an interior wood stain to the slats using a foam brush.
When the stain is dry, brush on three coats of a semi-gloss polyurethane to the table base and slats. Allow each coat to dry; lightly sand between coats with 320-grit sandpaper to remove rough spots.
Finish the Table
We'll show you how to secure the table base to the slats.
Step 1: Secure the Table Base to the Slats
Place a couple of sanded 2-inch-by-4-inch scrap wood pieces on the floor and lay your slats on them with the best facedown. These pieces will protect the finished parts from being scratched by the floor. Align the ends of the slats and butt them against one another.
Center the table assembly on the slats and secure the table base to the slats with 2-inch pocket hole screws through the aprons and stretchers.
Step 2: Add Felt Pads

With the top secured, add felt pads to the bottom of each table leg.
Can't find untreated 4-inch-by-4-inch lumber in your area? Use 2-inch-by-4-inch boards instead. For each leg, cut two boards 31 inches long and laminate them together with wood glue and clamps. When the glue has cured, rip the 3-1/2-inch-wide laminated blank to 3 inches in width, taking 1/4 inch of the width off each edge. Trim the laminated blank to 28-1/2 inches long and you'll have a 3-inch square leg.
Start the Wood Bench
Next, it's time to build the wood benches. Cut the legs and braces and then assemble them.
Step 1: Cut the Legs
For the benches, use the same procedure to prep the materials as you did with the table: Cut the part 1 inch longer than called for, trim to width and then cut to the final length. Prepare the material and cut the legs (A) and the braces (B) to size as shown in the Cutting Diagram. Cut a 6-degree angle on the tops of the legs using a miter saw and referring to the Project Diagram.
Position two legs on your work bench with the bottoms flush. Cut a 1/4-inch-thick spacer to place between the legs. Center the brace on top of the legs with the bottoms flush, and use the angled cut at the top of the legs to mark the angle at the top of the brace.
Step 2: Cut the Braces

Cut the angle on the brace using a jigsaw. Drill two pocket holes to secure the seats along the top edge of the braces. Sand the legs and braces with 180-grit sandpaper.
Step 3: Assemble the Legs and Braces

Assemble the legs and braces using glue and screws. Position the parts with the bottoms flush, separating the legs with the 1/4-inch spacer. We drilled 1/8-inch countersunk pilot holes so the screws would drive easily and not strip.
See our Power Drill Buying Guide to find the best drill for this and other DIY projects.
Set the DIY Dining Table Seat
Now it's times to make the dining table seats for the benches.
Step 1: Prepare the Stretchers
Cut the stretchers (C) and slats (D) to length and width. For the stretchers, drill four pocket holes equally spaced along the length. Sand the parts with 180-grit sandpaper.
Step 2: Attach the Stretchers

To attach the stretchers to the end assemblies, cut a scrap to 11-7/8-inches long and turn the end on its side. Place the stretcher in position and support the opposite end with the scrap. Predrill the hole and secure the stretcher to the leg brace with wood glue and screws. Add a second end assembly, flip the bench over and add the second stretcher.
Step 3: Apply the Finish
Apply a wood finish using the same process you used for the table.
Step 4: Finish the Bench

Place one of the seat slats on the bench so the edge of the slat is aligned with the 1/4-inch gap between the legs and centered end to end on the bench. To secure the slat to the bench, drive pocket hole screws from the underside. Place the remaining slat in position and secure.
Now your bench just needs some felt pads. Attach them to the leg bottoms and your table is ready for dinner.


DIY Table Directions: No Table Saw Required
If you don’t have a table saw, you can still create the table and benches. With a few modifications to the plans and a lot more sanding, you’ll be ready to go.
The table legs and aprons will be 3-1/2-inches wide and simply cut to length from 2-by-4 and 4-by-4 boards. The top planks will be 9-1/4-inches wide and cut to length from standard-issue 2-by-10 boards and so on.
Note these minor changes in the plans:
Table
Add 2 inches to the length of the braces (D) and 1 inch to the length of the stretchers (E).
Bench
The braces (B) will be inset 2-3/4-inches instead of 2-7/8-inches.
Let your lumber acclimate to your work space for one week prior to machining. The material will stabilize, and the boards will be less likely to twist when you cut the individual parts.
Ready for the next DIY wood project? Learn how to make this Easy-to-Build Wooden Desk.
Conclusion
Are you a DIYer looking for your next project? This wood dining table and benches is attractive and affordable.
It's an intermediate project that can be done in a weekend. Here's an overview on how to build this set.
Step 1: Make a table base.
Step 2: Work on the tabletop and stain it.
Step 3: Secure the table base to the top.
Step 4: Next, create the bench bases.
Step 5: Create the bench tops and secure each one to the base.
If you're ready to get started, order the supplies online and have them shipped to your home.