
Tools and Materials
Tools
Product costs, availability and item numbers may vary online or by market.
Determine the Size of the Bathroom Exhaust Fan
It's easiest to install a bathroom vent fan if you’re replacing an existing fan. You can use the existing switch, wires and ductwork. Also, it helps to get a fan that’s the same size as your existing fan so you won’t have to adjust the size of the ceiling hole. Use the information below to select a fan.
Fans are rated by CFM and sones. CFM stands for cubic feet per minute and it’s a measure of airflow. The size of your bathroom can help determine how many CFM you need for a bathroom fan replacement. Some manufacturers recommend the number of CFM based on square feet or cubic feet.
Length x Width = Square Feet
Length x Width x Height = Cubic Feet
Some manufacturers use the CFM formula below.
Length x Width x Height x 0.13 = Number of CFM (round up to nearest 10)
For example, 8.5 feet x 9.5 feet x 8 feet x 0.13 = 83.98 (round up to 90)
Choose a fan 90 CFM or larger.
As a general rule, small bathrooms typically require about 50 CFM, while large bathrooms require around 100 CFM. If your bathroom is larger than 100 square feet, add up the CFM for each fixture below:
Toilet: 50 CFM
Shower: 50 CFM
Bathtub: 50 CFM
Jet Tub: 100 CFM
Another factor when buying a bathroom exhaust fan is sones, which is a measurement of sound. The higher the number, the louder the fan; 2 is considered quiet.
Determine the Mounting Location


There are two ways that you can mount a bathroom exhaust fan.
Wall Mounted Bathroom Exhaust Fans
You can attach a wall mounted bathroom exhaust fan to an external wall in a bathroom. This type of fan pulls the air out of the bathroom, through the ducting and outside via the external wall of your home.
Ceiling Mounted Exhaust Fans
Ceiling mounted exhaust fans are the most common type found in homes. This type of fan pulls the air out of the bathroom, through the ducting and outside via the roof.
Determine the Exhaust Route
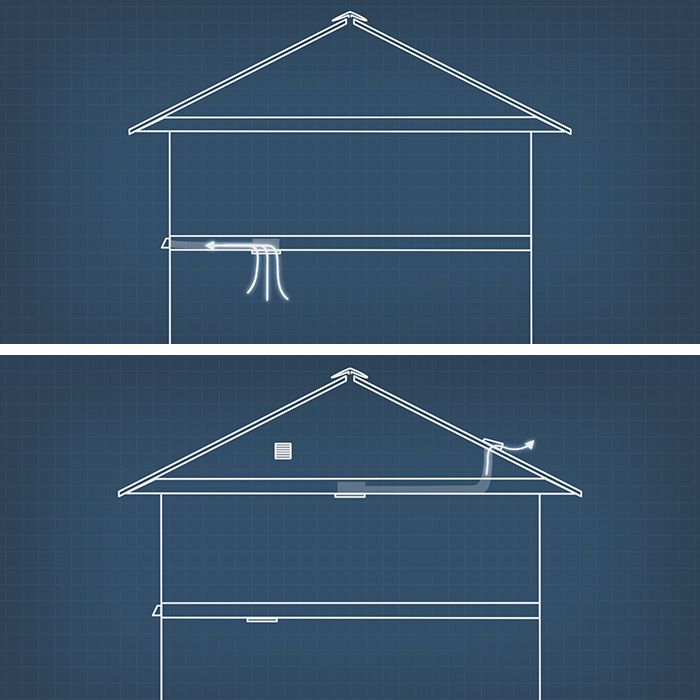
Bathroom fan installation requires outside ventilation. If the bathroom exhaust fan or venting fan isn’t accessible through an attic, you’ll need to vent through a sidewall of your house. If you're venting a bathroom fan through an external sidewall, then you’ll need a wall mounted bathroom exhaust fan. Builders typically install these types of ducts and vents when they build a house. If you don’t have a duct leading to a sidewall vent, call a professional for help.
If you have access to the attic, then you can vent a ceiling mounted exhaust fan through either a gable wall or the roof. Letting the fan exhaust into an open attic will cause moisture buildup on the underside of the roof. Avoid venting through a soffit vent or ridge vent. The warm air will exhaust out the duct and enter back into the attic through the soffit vent or ridge vent.
Determine Your Electrical Options

It’s easiest to use an existing switch when you replace a bathroom exhaust fan. Some fans include a light that can be operated separately with an additional switch or double switch. However, if your old fan doesn't have a light, you’ll need to install new wiring to operate a double switch.
Call an electrician if you’re not comfortable working with electricity.
Remove the Old Bathroom Fan
Remove your existing fan. How you install the new one will depend on your attic access.
Step 1: Turn Off the Power

Turn off the breaker to the fan. Remove the grille cover and use a circuit tester to check that the power is off.
Step 2: Remove the Motor

Remove the motor from the housing. If the motor is held in place with screws, remove the screws and disconnect the motor from the wiring.
Step 3: Remove the Housing

Fan manufacturers have different methods for securing housing.
- If your fan is held in place by mounting screws secured to a ceiling joist, remove the screws attached to the joist.
- If your fan is held in place with metal brackets secured to the ceiling joists, and you have access to the fan through an attic, remove the screws or nails holding the brackets to the joists. Then follow Option 1 below.
- If you don’t have access to the fan through the attic, you’ll have to cut the brackets from below. Use an oscillating saw or reciprocating saw to carefully cut the brackets. Avoid cutting electrical wires and expect to touch up the ceiling drywall with spackling later. Then follow Option 2 below.
Step 4: Disconnect the Electrical

Disconnect the electrical connections. Move the housing around in the hole so you can access the electrical and duct. Disconnect any additional electrical and pull the house wire out of the fan housing. Remove the exhaust duct from the fan too. Then remove the fan housing from the ceiling.
Option 1: Mount an Exhaust Fan With Attic Access
Always follow the specific instructions that were included with your fan. The following are typical steps for a bathroom exhaust fan installation when you have access to the attic.
Step 1: Adjust the Ceiling Hole

Hold the housing up to the ceiling hole to check that your fan fits. If the hole is too small, trace the housing onto the ceiling and then cut the ceiling with a keyhole saw.
Step 2: Patch the Ceiling

If the hole is too big, you’ll need to patch the ceiling. Cut a piece of drywall to make the ceiling hole the right size for your fan. Attach the drywall filler to a larger piece of wood; set it in the hole and drive screws through the ceiling into the wood. The patched areas can be repaired with spackling compound later.
Step 3: Attach the Duct Connector
Secure the duct connector to the fan housing. It should just slide in the slots.
Step 4: Attach the Housing Brackets
From the attic, secure the housing brackets to the ceiling joists. Typically, ceiling joists are spaced 16 to 24 inches apart on-center. Insert the brackets into the slots on the housing and then secure the brackets to the joists with screws or nails. Make sure the ceiling fan housing will be even with the ceiling below. Secure the brackets to the housing with a screw, if applicable.
Step 5: Prepare to Connect the Wiring

Remove the wiring cover on the housing, and remove the knockout plug with a screwdriver.
Step 6: Connect the House Wires

Pull the house wires through the clamp and tighten the screws. Using quick connector or wire connectors, connect the fan wires to the house wires, matching the colors. Green is the ground and connects to the green or bare copper house wire. White is neutral and connects to the white house wire. Black is hot and connects to the black house wire.
To use quick connectors, just push the bare wire into the connector. To use traditional wire connectors, hold the two wire ends together and twist the connector clockwise.
Don’t cover the connections with electrical tape unless you're required to do so by code.
Step 7: Replace the Wires

Push the wires into the housing. Secure the wiring cover to the housing with screws.
Step 8: Connect the Duct

Connect the duct. Secure a 4-inch duct to the duct connector with HVAC tape or a clamp. The duct should vent to the outside. If you don’t have an attic duct, see the installation steps later in these instructions.
Step 9: Test the Fan
Turn on the power and check that the fan works. Some fans are extremely quiet, so listen carefully.
Install the grille by squeezing the springs into the slots and pushing the cover toward the fan. Touch up the ceiling with spackling compound and ceiling paint.
Option 2: Mount an Exhaust Fan Without Attic Access
Always follow the specific instructions that were included with your fan. The following steps provide a general overview of how to install a bathroom fan when you don't have access to the fan from the attic.
Step 1: Adjust the Ceiling Hole
Hold the housing up to the hole to check that your fan fits. If the hole is too small, trace the housing onto the ceiling and then cut the ceiling with a keyhole saw.
Step 2: Patch the Ceiling

If the hole is too big, you’ll need to patch the ceiling. Cut a piece of drywall to make the ceiling hole the right size for your fan. Attach the drywall filler to a larger piece of wood; set it in the hole and drive screws through the ceiling into the wood. The patched areas can be repaired with spackling compound later.
Also make sure the fan can be mounted to at least one ceiling joist. If your old fan wasn’t attached to a joist and there's a space between the joist and the ceiling hole, attach lumber to the joist and build it out next to the hole so the fan can be screwed to solid wood.
On the side of the hole opposite the joist, attach a piece of 1x lumber inside the hole. Just drive screws through the ceiling. Now you’ll have two sides to secure the fan housing.
Step 3: Attach the Duct

Secure the duct connector to the duct in the ceiling with HVAC tape or a clamp. Be sure to install the duct in the position specified by the instructions so the housing will line up correctly. The duct should vent to the outside. Then use a screw to attach the duct connector to the edge of the hole so it'll line up with the exhaust on the fan housing. Some manufacturers suggest securing the duct connector to the edge of the ceiling hole. Determine where it'll attach the fan housing and secure it to the ceiling with a screw.
Step 4: Prepare to Connect the Wiring
Remove the wiring cover on the housing, and remove the knockout plug with a screwdriver.
Step 5: Attach the Cable Clamp

Secure a cable clamp to the hole on the wiring cover.
Step 6: Connect the House Wires
Pull the house wires through the clamp and tighten the screws. Using quick connectors or wire connectors, connect the fan wires to the house wires matching the colors. Green is the ground and connects to the green or bare copper house wire. White is neutral and connects to the white house wire. Black is hot and connects to the black house wire.
To use quick connectors, just push the bare wire into the connector. To use traditional wire connectors, hold the two wire ends together and twist the connector clockwise.
Don’t cover the connections with electrical tape unless you're required to do so by code. You might need someone to hold the fan while you’re connecting the electrical.
Step 7: Replace the Wires
Push the wires into the housing and secure the wiring cover to the housing with screws.
Step 8: Connect the Duct

Insert the fan into the ceiling hole, lining up the exhaust with the duct connector. Secure the fan to the wood supports with screws through the mounting flange.
Step 9: Test the Fan
Turn on the power and check that the fan works. Some fans are extremely quiet, so listen carefully.
Install the grille by squeezing the springs into the slots and pushing the cover toward the fan. Touch up the ceiling with spackling compound and ceiling paint.
How to Install an Attic Duct With a Roof Vent
These steps outline how to install a flexible duct with an attic roof vent. If you’re not comfortable working on a ladder, call a professional for help. An insulated duct will help prevent condensation when the warm air from the bathroom meets the cold duct in the attic.
Step 1: Prepare the Duct

Pull back the insulation on the flexible duct. Connect the duct to the fan with HVAC tape or a clamp. Pull the insulation back over the connection.
Use a piece of plywood over the ceiling joists as a work surface.
Step 2: Trim the Duct

Hold the other end of the flexible duct against your installation spot on the underside of the roof between two rafters. Cut the duct to length with scissors or a utility knife. The wire of the duct can be cut with side cutters.
Allow enough length of duct to avoid making tight bends. Tight bends in the duct can restrict airflow.
Step 3: Position the Connector

Drill a hole through the roof with a small drill bit. Leave the bit in the roof so you can find it from the outside. From the outside, locate the drill bit. Use a 5-inch hole saw to cut a hole through the shingles and roof. It might take some time to cut through the roof.
Step 4: Prepare the Roof

Attach the duct connector to the roof vent cap. Insert the connector in the hole, straighten the cap and trace the outline on the shingles. Remove the cap.
Cut away the shingles just inside the outline following the manufacturer’s directions. Cutting inside the outline will leave a little bit of overlap of the roof cap.
Step 5: Finish the Roof

Apply roof cement around the hole and insert the roof cap. It should slide under the shingles. Even it up with the shingles and secure with roofing nails. Apply roof cement where the shingles overlap the roof cap flange and cover any nail holes.
Step 6: Install the Duct

From the inside, attach the flexible duct to the duct connector with HVAC tape or a clamp. Pull the insulation over the connection.
To prevent the insulation from sliding down the duct, wrap the connections a few times with HVAC tape.
The Cost to Install a Bathroom Fan
Once you have a basic understanding of how to add an exhaust fan to a bathroom, you’ll need to purchase the right model for the space. Bathroom fans are available in a wide range of prices depending upon your needs. If you’re doing the work yourself, you’ll need the appropriate tools and safety gear. If you don’t already own these, be sure to factor the extra cost into the price of installation when budgeting.