
Tools and Materials
Items may be Special Order in some stores. Product costs, availability and item numbers may vary online or by market. Paint colors may vary slightly from those shown. Availability varies by market for lumber species and sizes.
Key Takeaways
- A post-mounted patio table is a space-saving DIY project that attaches directly to an existing deck or patio post.
- The table is typically built around a 6x6 post, creating a sturdy, built-in surface.
- Table height is adjustable based on use.
- Construction starts with building a frame (rails, sides, ends, brace) securely fastened to the post.
- Use pilot holes and deck screws to ensure tight joints and prevent wood splitting.
- After the frame, install tabletop slats and trim to complete the surface.
- Materials like cedar are recommended for durability and outdoor appearance.
- The project can be customized to match your space and enhance patio style and functionality.
- Finishing touches like stain, décor, lighting and planters help blend the table into your outdoor design.
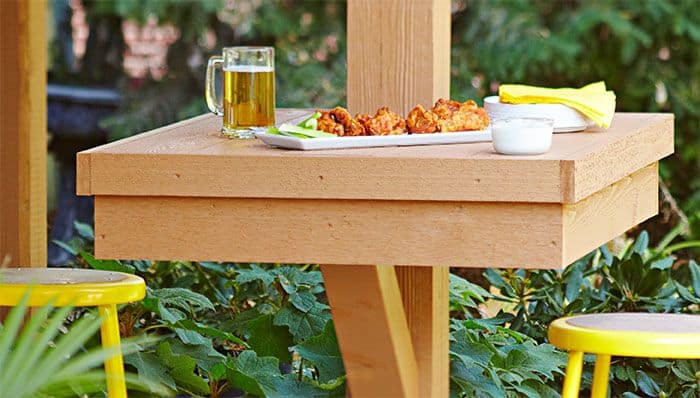
How to Build an Outdoor Bar Table
Using the Project Diagram is the perfect way to add a table or two to your patio. The height at which you mount your table depends on how you intend to use it since the height is adjustable. For a stand-up table, 42 inches is a good height.
The cedar boards used in this project have one smooth-planed face and one rough-sawn face. On the parts with exposed surfaces, orient the rough face out. The table is designed to fit around a 6-by-6 post (actual dimensions: 5-1/2 inches by 5-1/2 inches).
Build the Table Frame
Begin by asssembling a basic frame for the table.
Step 1: Trim Rails to Appropriate Size

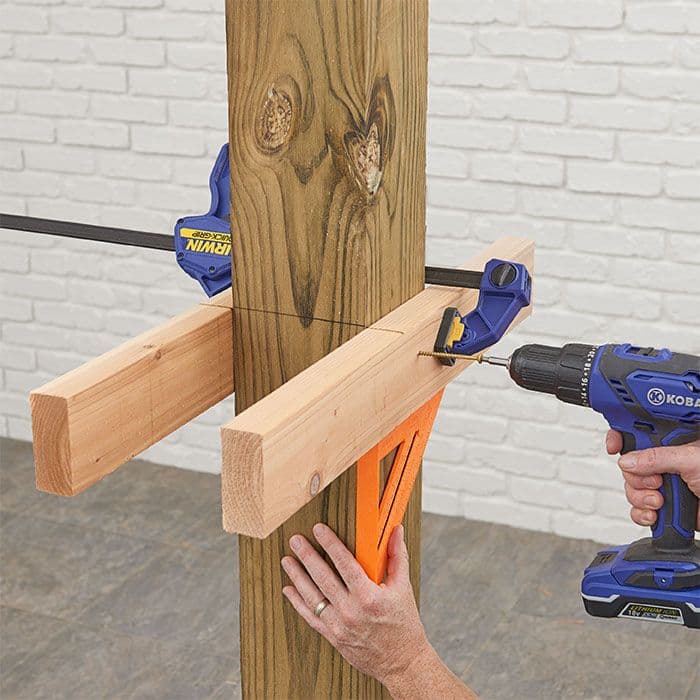
Cut the rails (A) to length. Mark the mounting height on the post — remember to lower it by 13/16 inches for the thickness of the tabletop slats. Clamp the rails to the post, centered end to end and square to the post. The table protrudes about 18 inches at the front, 11-3/4 inches at the sides, and 11-1/4 inches at the back. Orient the rails (A) so the front of the table faces the desired direction. Drill pilot holes through the rails and drive 2-1/2-inch deck screws.
Drilling pilot holes through the rails allows the screw threads to grip only in the post, not the rail. This allows the screws to draw the rails tightly against the post.
Step 2: Trim the First Set of Sides Down to Size
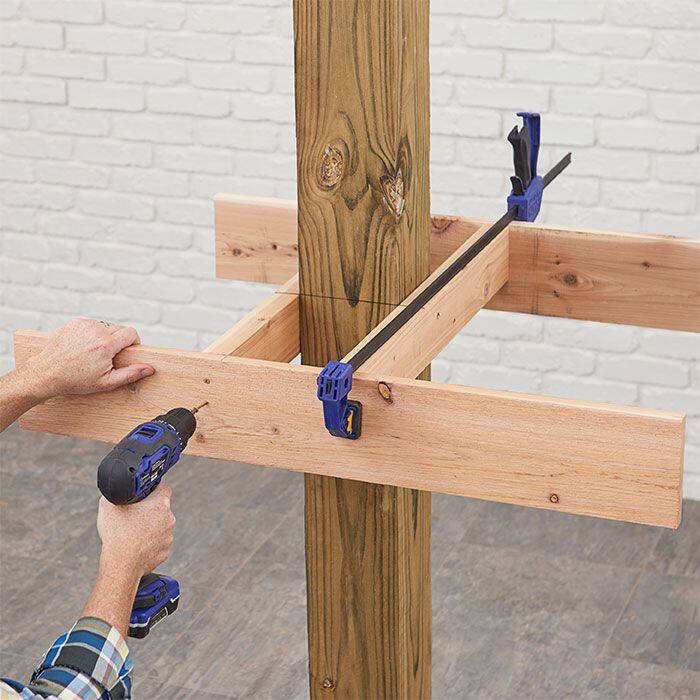
Cut the sides (B) to length. Mark lines on the inside faces of the sides 10-1/2 inches from one end. Clamp the sides to the ends of the rails (A), aligning the marked lines with the inside face of the rear rail (A). Drill countersunk pilot holes through the sides and drive 2-1/2-inch deck screws into the rails.
Step 3: Trim the Additional Set of Sides Down to Size

Cut the ends (C) to length. Clamp the ends between the sides (B), drill countersunk pilot holes through the sides, and drive 2-1/2-inch deck screws through the sides into the ends.
Where the screw holes are very close to the ends of the parts, drilling countersunk pilot holes prevents splitting when driving the screws. When drilling the pilot holes, only drill through the sides (B) and not into the ends (C). The screws will drive easily into the end grain of the ends without a pilot hole and will hold more securely.
Step 4: Trim the Brace Down to Size

Cut the brace (D) to length. Then make the angled cuts on the brace ends. Holding the top of the brace flush with the top edge of the front end (C), drive 2-1/2-inch deck screws through the end and into the brace.
Step 5: Drill Holes for the Screws
Drill pilot holes through the lower end of the brace (D) and drive 3-inch deck screws through the brace and into the post.
Add the Slats and Trim
After constructing your patio table, it's time to add the slats and some trim.
Step 1: Cut the Remaining Slats Down to Size
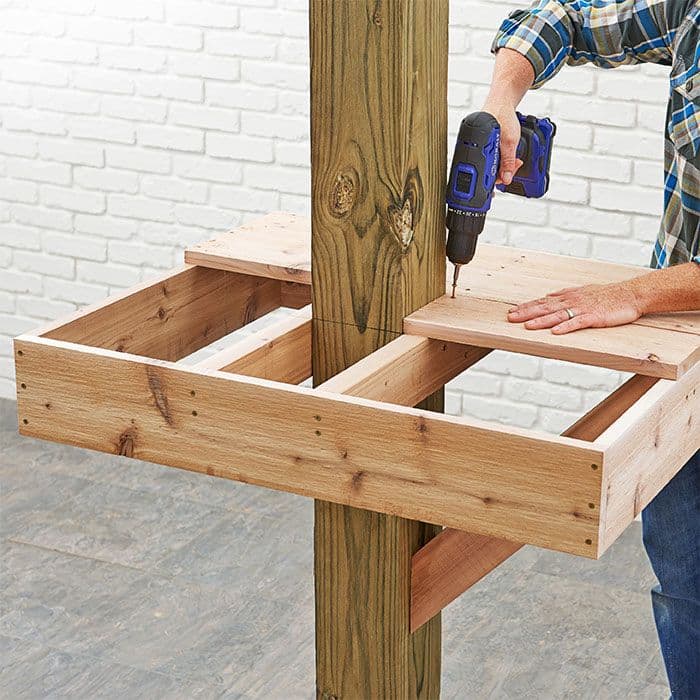
Cut the slats (E, F, G) to length. Position the slats, drill pilot holes for the screws at the slat ends and screw the slats to the rails (A) and ends (C).
Step 2: Finish the Trimming Components
Cut the side trim (H) and end trim (I) to length. Screw the side trim to a side (B) and the end trim to an end (C). Drill countersunk pilot holes through the ends of the end trim and screw the end trim to the side trim.
Step 3: Sand the Exposed Corners and Edges
To prevent splinters, sand slight bevels on all exposed edges and corners. Remove the sanding dust and apply an exterior sealer/stain to all parts, double-coating all exposed end grain (Rustic Cedar shown). If you wish, stain the post, too.
Decorating Ideas for Your Patio

Before you start building your patio table project, it's important to consider what kind of general aesthetic you're going for in your patio area. Do you want something simple and rustic, or ornate and elegant? Our patio furniture options include pieces for every style.
Attractive and easy decorating ideas to complement your outdoor bar table include:
- Hanging outdoor string lights
- Installing a raised planter box
- Creating a backyard escape for relaxation and socializing
- Making small updates to optimize your patio space
Whatever you decide on, consider enhancing the overall look of the area by decorating your outdoor space for the season with a few simple tips. When you're working on your DIY patio table, for example, try picking out materials that will fit in visually with the patterns and style of the furniture you already plan to use for the area.
Ready to Makeover Your Patio?
Whether you need seating options or finishing touches, it’s easy to make your patio a perfectly relaxing outdoor oasis with DIY help and décor items from Lowe’s. Here are some popular choices Lowe’s customers opt for when designing the patio of their dreams.


Building a Post-Mounted Patio Table: FAQ
Here are a few common questions to help you plan and build a post-mounted patio table. These quick answers cover the basics, from design and sizing to choosing the right materials for outdoor durability.
What Is a Post-Mounted Patio Table?
A post-mounted patio table is a DIY outdoor table that attaches directly to a deck or patio support post, creating a sturdy, space-saving surface for dining or entertaining.
How Tall Should a Post-Mounted Patio Table Be?
The height depends on how you plan to use it, but a common standard is about 42 inches for bar-height seating. You can adjust the height to fit chairs or stools you already have.
What Materials Are Best for Building a Post-Mounted Patio Table?
Durable, weather-resistant woods like cedar or pressure-treated lumber are ideal for outdoor use, as they resist moisture, insects and decay.