
Tools and Materials
Product costs, availability and item numbers may vary online or by market.
Before You Begin
Do you need to replace your unit or will maintenance or repair suffice? If you’re not getting hot water, the heating element may have failed, or it may be another repair issue. Take a quick maintenance assessment before embarking on a full replacement. If you have water on the floor or on top of the unit (this is different from water leaking from a supply line above the unit), you’ll probably need a new water heater.
The data plate on your current tank has the date of manufacture, size and energy specifications that help make buying a comparable unit easier. If your family size has changed, it's a good time to consider upgrading or possibly downsizing your electric water heater.
If you're having trouble deciding which electric water heater is the right option for your home, our Water Heater Buying Guide can help you find the best option.
Check on Permits


Before starting your water heater installation project, check with your local building department or code enforcement office. You may need a plumbing permit from your local building department to install a water heater in your home. Additionally, an electrical permit may be necessary. The permit allows a local code inspector to review the installation and ensure it is done safely and correctly. Improper installation or connection of the water heater can increase the risk of fire, explosion, or other hazardous conditions.
Check Your Water Pressure
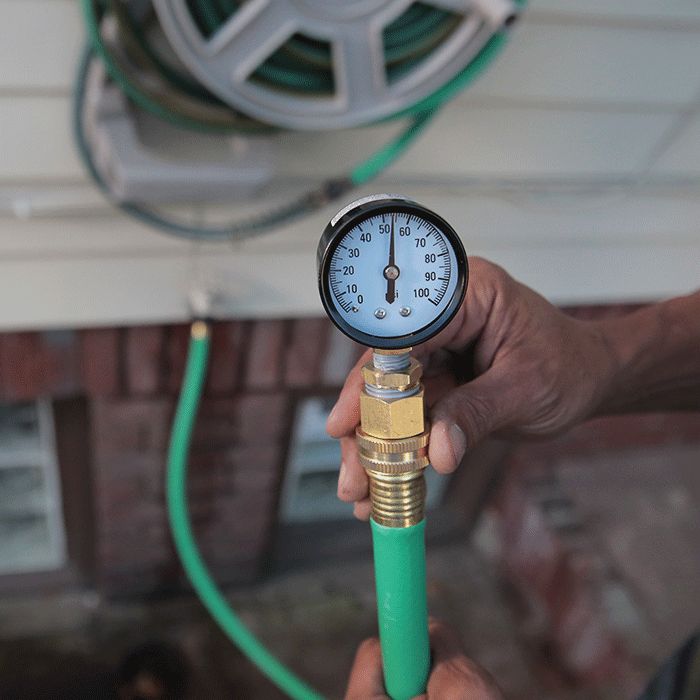
Your home’s water pressure is important for all water-using appliances. Reduced pressure lessens stress on plumbing lines and extends the life of appliances and fixtures.
Check your home’s water pressure using a pressure gauge on your outdoor spigot. 50- to 60-PSI is ideal. If your home’s water pressure is greater than 80-PSI, lower it with the pressure-reducing valve at the main water shut-off.
You may want to consider an inline pressure gauge for pressure monitoring. If your home doesn’t have a pressure-reducing valve, a pro can install one for you.
Do I Need an Expansion Tank?
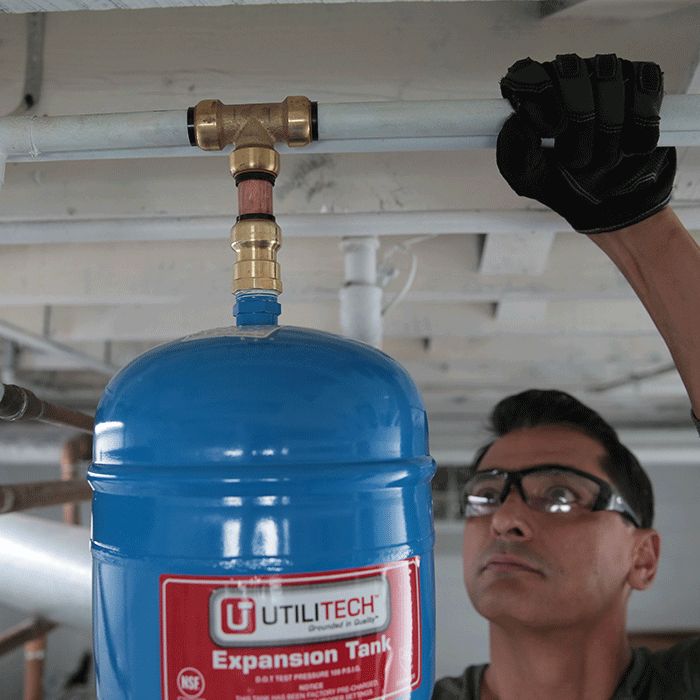
A thermal expansion tank alleviates excess pressure in the lines of a closed system. A 2-gallon expansion tank works with water heaters up to 50 gallons. Use a 5-gallon expansion tank for water heaters up to 100 gallons. Check the manufacturer’s recommendations for exact sizing.
The expansion tank installs to the cold-water supply line near/above your water heater. You can install an expansion tank using push-fit fittings. They slide into the pipe; no soldering is needed. If you decide use solder fittings, de-burr the pipe and fittings, and clean them. Apply soldering paste to both the pipe and fittings and assemble.
Electric water heater installation requires that the expansion tank pressure match the main water pressure to work effectively. Use a hand air pump to increase pressure or depress the valve to lower it.
Removing the Old Water Heater
Before you can install a new water heater, you must remove the old unit. If your unit is old, it may be filled with sediment, causing it to be very heavy. Be sure to have a helper and a hand truck to help with removal.
Turn the Power Off

Turn off the electricity to the water heater at the circuit breaker. Use a circuit tester to make sure the power is off. Use tape to mark the wire connections and disconnect the wires by removing the wire connectors.
Drain the Water Heater

With the water supply still on, turn a nearby faucet on hot and let it run until the water is cool. Shut off the cold-water supply line and connect a garden hose to the drain valve on the bottom of the water heater. Open the drain valve and empty the water heater into buckets or down a drain.
Remove the Old Tank

When the tank is empty, remove the garden hose and discharge pipe from the temperature and pressure (T&P) relief valve. Disconnect the water supply lines. If you must cut them, leave them as long as possible. Have someone help you remove the old tank with a hand truck.
Check with your local recycling center or waste management for proper disposal of your old unit.
Installing Your New Electric Water Heater
With the old water heater out of the way, you can now begin to install the new unit. Follow these steps for a proper installation.
Water heaters can be heavy and awkward to move. Use a helper, appliance dolly or hand truck when moving the appliance.
Set the New Heater in Place

Place the new water heater in a drain pan. Drain pans are made from plastic, aluminum, galvanized steel or stainless steel. Your drain pan should be at least two inches wider than the diameter of your new water heater. It should be between 1-1/2 to 2-1/2 inches in depth. Local building codes may specify the type and size of the drain pan that is required. Also, leave at least 6 inches of clearance around the heater for ventilation.
You can avoid possible overflow by routing a pipe from the drain pan to a drain. Check to make sure the drain pan connector is the correct type of pipe you are using, either PVC or CPVC. Lay out your new drain lines along where the old lines are so you can measure, cut, prime and glue them in place.
If possible, place your new water heater in close proximity to where the old one was located. This will help with the water and electrical connections.
Install the T&P Relief Valve and Runoff Tube

If your water heater didn't come with a new T&P (temperature and pressure) relief valve installed, simply twist in the new valve now. The T&P valve automatically opens if the temperature or pressure becomes too high for the tank. It may be in the box, or you may need to buy your own. Don't reuse the old valve.
Position the runoff tube from the T&P relief valve toward the drain pan or drain. Cut the tube so it's no more than 4 inches above the floor. Apply some Teflon tape and pipe glue to the threads. Attach the tube into the valve, hand tightening until it is snug. If there's no drain pan or drain underneath the tube, put a bucket underneath to catch any water dripping from the runoff tube.
Preparing the Water Fittings

Many of today’s new water heaters come pre-equipped with dielectric water fittings for the hot and cold supplies. These fittings are designed to reduce corrosion between two different metals. Apply thread tape and sealant to the fittings before attaching any supply lines.
Install a Thermal Expansion Tank

Before connecting the water supply, you should install a thermal expansion tank. Expansion tanks are designed to protect your water heater, appliances and fixtures from excess water pressure and avoid “water hammering,” which is the noise in the lines as the water is heated.
Expansion tanks can be placed just above the water heater supply intake or along the water supply line. For this example, connect the T fitting to the intake fitting and tighten with your adjustable wrench. Next, remove the air valve cover and measure the tank’s air pressure with your air pressure gauge. You want the tank pressure to match your home’s water pressure that you measured previously. Many tanks come pre-charged at 40-PSI. Check the tanks’ pressure and add air with your manual air pump if necessary to match your home’s water pressure. Thread the tank onto the T fitting and tighten. Add a connection fitting to the open T fitting for the water supply line.
Connect the Water Supply

Now you can attach the water supply lines. Premade supply lines are very handy as they come already assembled with fittings, rubber gaskets so you don’t need tape, push to fit pex connections and a shut-off valve. Simply attach the threaded end to the fitting on the T that you just installed and tighten.
Next, bend the supply line up and measure to the old cold water supply line. If you need to trim the old line to make a straight connection, use a pipe cutter to make a clean cut and then deburr the end. The deburring tool can also help mark the connector depth. Push the connector onto the hose to the mark. Repeat the process for the hot water (red) side and tighten all connections.
Flexible supply lines may be required in earthquake-prone areas. Also, some areas require seismic straps to prevent earthquake damage. These straps brace the water tank against the wall to keep the unit from toppling over.
Fill and Flush the Tank

Make sure the in-line shut-off valve just above the water heater is closed. Remove the aerator from the nearest faucet and open the hot side. Turn on the water supply at the main valve and slowly open the in-line valve. Check connections around the water heater for leaks. If you're leak free, fill the tank. If you have leaks, shut off the water supply and gently tighten the connections. Repeat until the connections are secure.
When water runs from the faucet, the tank is full. Let the water run for three minutes to flush the tank and empty air and any debris that may be inside the tank and lines.
The tank must be full before connecting the wiring to avoid dry firing, which ruins the heating element.
Connect the Wiring and Power Up

Use your masking tape connection notes as a guide for making your electrical connections. Attach the ground wire to the green ground screw by forming a small hook in the wire. Next connect the black and red wires with those on your new unit. Wire connections will be two hot wires and one ground wire. Twist the wires together with wire connectors.
Once the connections have been made, place the wires into the electrical compartment and secure the remaining cover. Return to your breaker box and turn the power to the unit back on. If your new water heater doesn't have power, turn the circuit off and check the connections.
Set the Water Temperature

Follow the manufacturer’s instructions to set the temperature to 120 degrees Fahrenheit. It may take several hours to initially heat the water.
Check the Discharge Pipe

After a few hours, check the discharge pipe that runs out of the T&P relief valve. A dripping pipe usually means the pressure is too high. Turn the pressure down below 80-PSI.
Water coming from the discharge pipe may be hot.
Check Aeration and Water Flow

If a faucet stops running after installation, remove the aerator from the faucet in question and let the water run for a few minutes to clear loose sediment. Rinse and replace the aerator.
Preventing Scalding
Even with the temperature gauge set to 120 degrees, scalding is still a concern. Children, older people and those with sensitive skin are especially at risk. Consider installing thermostatic mixing valves to prevent injury.
Installed at the point-of-use faucet, fixture or appliance, a thermostatic mixing valve controls both the volume and temperature of water by attaching to both the hot- and cold-water supply. The settings may be adjusted inside the valve itself to provide optimum comfort.
Installing the Valve
Turn off the water supply. Because the water may be ingested, use only tapes, pipe, solder and other materials that are safe for potable water.
Next, solder the connections to the valve before attaching to the plumbing. Connect the valve to the hot and cold-water supply and the outlet pipe. If additional soldering is needed, maintain a safe distance from the valve because excessive heat may cause damage.
Turn the water supply on to test for leaks. Tighten and correct, as necessary. Follow the manufacturer’s instructions for adjusting water temperature.
Refer to the manufacturer’s instructions for installing a thermostatic mixing valve.

Replacing a water heater may seem like a complicated job. But by taking your time and following the directions, it can be a do-it-yourself friendly project.
Still unsure or don't have time to do this project yourself? Check out our professional water heater installation service.