
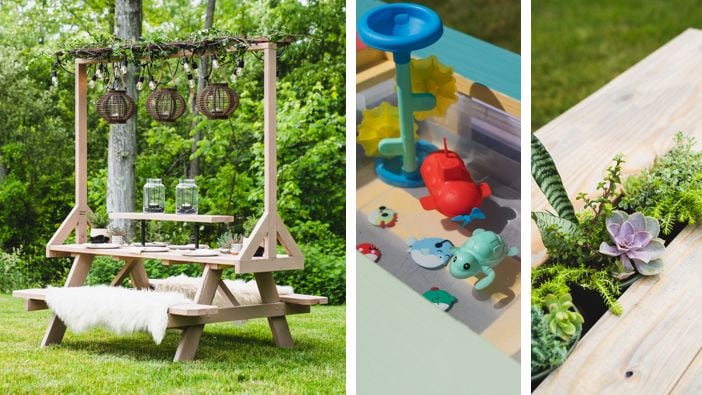
Elevated Dining Picnic Table


Outdoor dining doesn’t have to be run-of-the-mill. Turn a plain picnic table into a fancy dining table with a custom trellis, lighting, built-in serving area and greenery to create ambiance.
Go from flat to vertical with the addition of a custom trellis. Start by creating two vertical braces that you’ll attach to either end of the table with construction screws. Add a 2-by-4 vertically to connect the braces, then attach a trellis on top of the 2-by-4.
For your raised serving area, cut the wood to your desired width and length. You want it to be large enough for a serving area but small enough that you can still function around it. Sand the edges and surface, then attach galvanized pipe fittings to create the tier. Add flanges to the base of the pipe fittings, center the tier on the table and drill directly into the table with wood screws. Sand the table to smooth out the rough spots before staining.
Add string lights, greenery, decorative lanterns and more to the trellis to create a soothing vibe and turn any meal into a special occasion.
Kids' Activity Zone
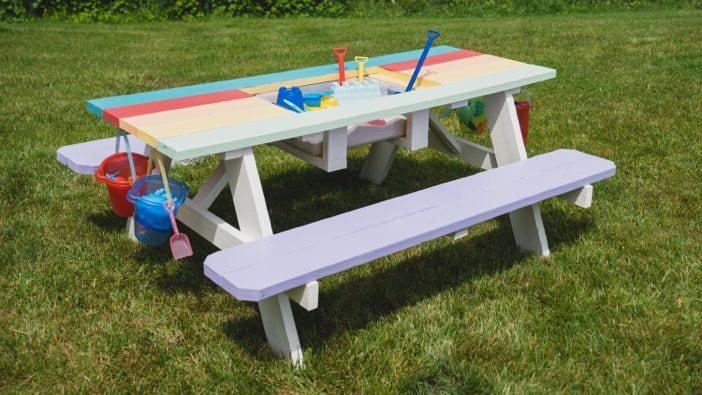
With just a few tools, Monica shows you how to turn a standard picnic table into an activity zone that’ll get the kids out of the house and keep them occupied in the backyard. The multicolored table is bright and cheerful, while the sand and water compartment can be hidden when not in use.
To construct the activity zone, start by removing the three center boards of the table, cut them into thirds, reinstall them on the left and right side and use the center section as the removable lid. Next, create a U-shaped under-table support to cradle a plastic bin that'll hold the sand or water. For the final touches, paint the table, add screw hooks to hang buckets for storage and you’re all set.
Once removed, your boards might have exposed nails so handle them with care. Also, try not to damage the boards when removing them because you’ll be reinstalling them.
Built-In Storage
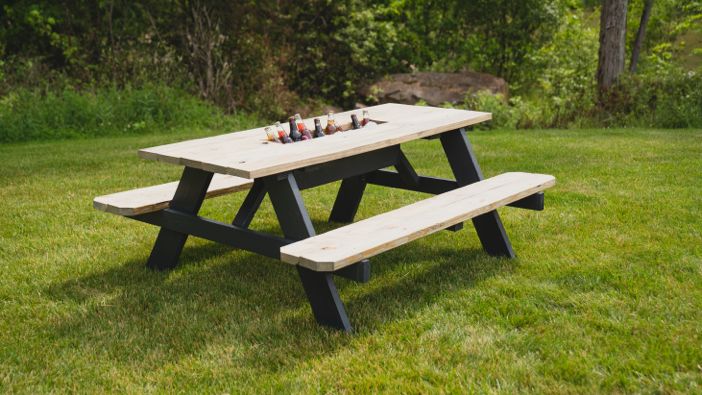
A picnic table can be more than just a surface upon which to eat. Monica shows us how to create a versatile, custom, center console with three different ways to use it.
Start by removing the center table board. For the storage area, you can create a vessel or simply insert a window box planter. Next, attach angle irons to the box for hanging, flip the table over, center the box vertically and horizontally, and attach it to the table using screws and the angle irons. Add 2-by-4 supports and flip the table upright. Mark, cut and fill back in the removed board and, if needed, add new angle brackets for support. Paint and stain the table, allow it to dry and you’re all set to use it as a cooler, for food storage, a plant stand or whatever you want.