
Tools and Materials
Tools
Product costs, availability and item numbers may vary online or by market.
Key Takeaways
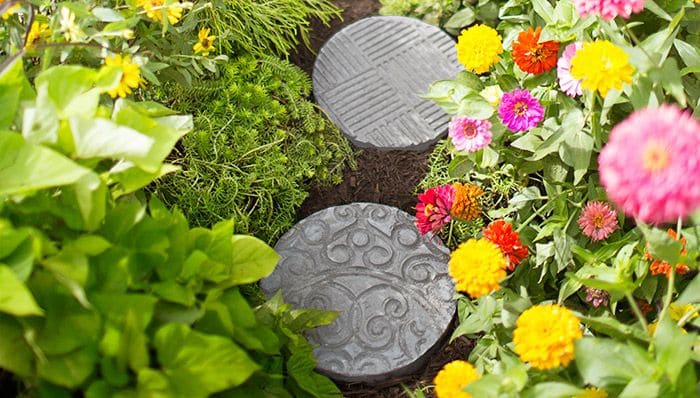
- DIY concrete stepping stones are an easy, customizable way to create a unique garden or yard walkway.
- Sand-mix concrete creates a smoother surface that highlights textures and patterns, while gravel-based mixes produce a rougher finish.
- Concrete and cement are not the same. Cement is an ingredient in concrete and concrete is the recommended material for stepping stones.
- Simple molds made from concrete form tubes allow you to create round stepping stones in custom sizes.
- Proper concrete mixing is essential. Adding too much water can weaken the finished stones.
- Rubber mats, rope, doormats and other textured materials can create custom patterns and designs in concrete.
- Allow stepping stones to cure fully before installation to improve durability and strength.
- Install stepping stones on a base of paver sand for better drainage, stability and easier leveling.
- Periodic sealing can help protect concrete stepping stones and maintain their appearance.
- Always call 811 before digging to locate underground utilities and avoid potential hazards.
The Best Concrete for Stepping Stones
Do-it-yourself walkways are easy to make but choose the right concrete for your DIY stepping stones. Concrete mixes vary and give different results. Standard, general-purpose concrete mix combines cement with gravel and stones while sand-mix concrete uses coarse sand with the cement. If you want the finished stones to have a rougher texture, a gravel-based mix is the best concrete for the stepping stones. If you want a smoother finish, sand-mix concrete is best. We’re using sand-mix concrete for our stepping stones to give the custom textures the greatest impact.
DIY Cement Stepping Stones vs Concrete Stepping Stones
You might think of cement and concrete as two words for the same material, but they are different. Cement is a component of concrete mix and needs aggregates, such as gravel or sand, to give the finished material strength and make it stable. Concrete mix combines cement and aggregates. Concrete alone isn’t suitable for DIY stepping stones.


DIY Concrete Stepping Stone Instructions
You’ll need to mix concrete for the stepping stones. Before you begin this project, learn how to mix concrete by hand.
Step 1: Cut DIY Concrete Stepping Stone Molds
Mark the concrete form tube 2 inches from one end and carefully saw a ring from the tube. Check the shape of the ring to make sure it forms a circle — not an oval. Repeat for each concrete stepping-stone you plan to make.
Here’s an easy way to mark the tube for level stepping stones. Stand the tube on end on a flat surface. Rest a permanent marker on a piece (or pieces) of scrap wood cut long enough to raise the marker tip 2 inches above the work surface. Then guide the marker around the tube to create an even line.
Step 2: Create a Smooth Base for the Stepping Stone Molds
Tear off 4-inch-long pieces of duct tape and use them to tape the outside of the tube ring to the blank corrugated sign. Overlap the tape pieces to make sure the concrete won’t leak out. Tape additional rings to the sign as space allows. (You can clean and reuse the sign when you’re finished.)
Step 3: Mix Concrete for the Stepping Stones
Wearing eye protection, a respirator and latex or nitrile gloves, gradually add water to about 30 pounds of concrete mix for the stepping stones according to the manufacturer’s instructions. This lets you pour two stepping-stones at a time. When you squeeze a handful of the wet mix, it should hold its shape but not crumble when pinched.
Adding extra water to the mixture might make it easier to pour it into the mold but will weaken the finished project.
Step 4: Pour Concrete Into the Stepping Stone Mold
Pour concrete into one of the rings until the mixture extends just above the edge of the ring. Gently shake or bounce the concrete stepping stone mold as you fill it to force out any air bubbles.
Step 5: Add Texture to Your DIY Concrete Stepping Stone


Press the design side of the rubber mat firmly into the top of the form and hold it there. Leave the mat in place for 24 hours before peeling it free; then allow the concrete to cure another 24 hours. Repeat steps 4 and 5 for each stepping stone mold.
Step 6: Remove the Concrete Stepping Stones From the Molds
Remove the duct tape from the corrugated sign and pull the stepping stones away. Use a utility knife to score the rings from edge to edge and peel off the forms. Allow the stones to cure an additional 48 hours before using.
Concrete won’t stick to the corrugated sign or rubber mat, allowing you to use them to make more stepping-stones. When you’re finished, scrub the mat clean and use it around the house.
Try Different Textures on Your DIY Stepping Stone Concrete: Ideas
Add some variety to your walkway by molding different textures into the concrete for the stepping stones.
1. Create a More Geometric Stepping Stone Pattern

For an alternative to the wavy-line texture of the mat shown in the previous section, select one with squares of alternating lines.
2. Create a Stepping Stone With a Braided Texture

Many objects can be used to create textures, as long as they don’t stick to the concrete. For example, cut lengths of 1/2-inch nylon twisted rope long enough to span the mold ring. Place them side by side on the moist concrete and press them into the surface by hand. Allow them to remain until the concrete cures for one day and then remove.
3. Create an Ornate Stepping Stone Pattern
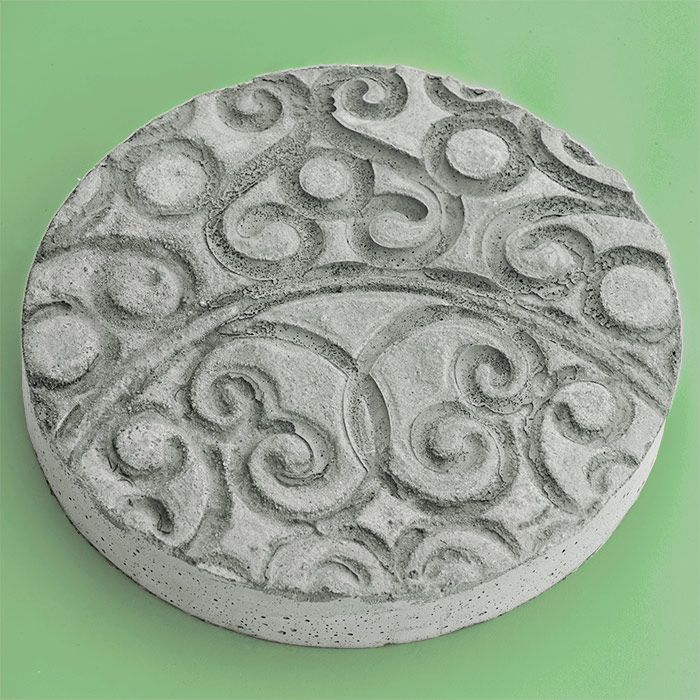
For a bolder design, select a door mat with an intricate cut-out design. As with the other mats, allow it to remain pressed into the concrete for 24 hours.
4. Combine a Design and a Smooth Face
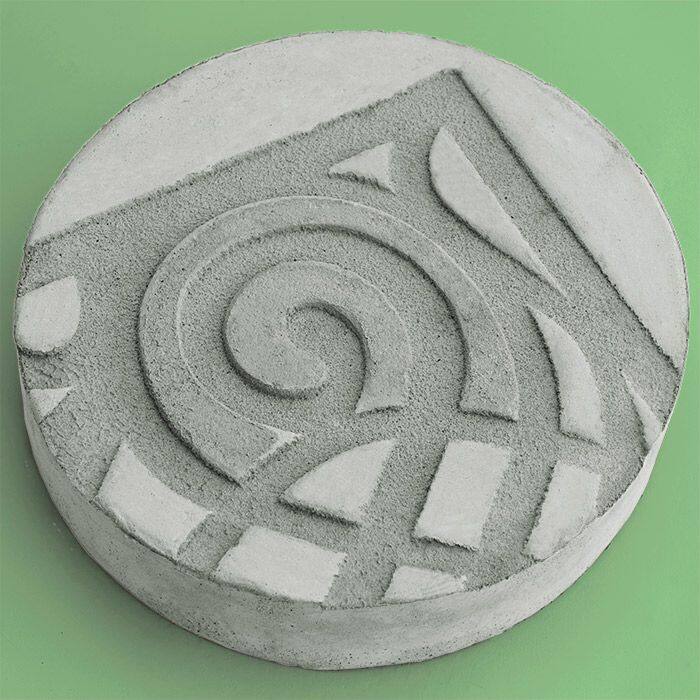
You don’t need to cover all of the surface with a design. Here, we pressed just a corner of a door mat with a bold design into the concrete.
Using DIY Concrete Stepping Stones

Here are some tips for using your customized stepping stones:
- Consider sealing your concrete stepping stones periodically to keep them looking great.
- Spacing between stepping stones varies, typically from 3 to 6 inches. Dry fit them and test spacing with family members to find a comfortable layout.
- When setting your stepping stones in place, it’s best to cut out the turf or ground and set them on 2 to 3 inches of paver sand. The sand allows drainage, creates a firm base and allows you to adjust the stones easily.
- If you’re not laying your DIY stepping stones in turf, add landscape rock or mulch around them to create contrast and give the project a professional look.
- As the ground freezes and thaws, stepping stones may shift over time. Adjust them as necessary to reduce tripping hazards.
- Use care in sub-freezing temperatures. The textures hold water, which will freeze.
Before beginning any excavation, call 811 to check for underground utilities.