
Tools and Materials
Essential Toilet Repair Facts and Tips


- When you remove a toilet, replace the wax ring seal between the toilet and the toilet anchor flange, sometimes called a closet flange, attached to the floor.
- Anytime a wax seal is replaced, you should replace the T bolts that attach the toilet to the toilet flange. If they’re corroded, you’ll need a can of hardware lubricant to loosen them. There are repair kits that include a wax ring and new mounting bolts.
- Replacing vinyl sheet flooring with something thicker, such as ceramic tile, can create a gap between the toilet and the toilet flange. If that’s the case, add a flange ring to fill the gap. The toilet flange should sit flush at the top of the finished floor.
- If you’re removing the toilet because of a leak at the base or water damage in the ceiling below, confirm the extent of the damage before heading to the store. Water can damage the subfloor enough to affect the strength of the mounting bolts attaching the toilet flange — and the toilet — to the floor. Determine whether you need to cut away the damaged subfloor and replace it.


Drain and Remove the Toilet
Have a bucket and some towels or cloths within reach to catch any drips when you turn off and disconnect the water supply line.
Step 1: Empty the Toilet
Turn the water supply to the toilet off by turning the valve clockwise. The water supply valve should be located behind the toilet just to the left. If a valve isn’t present, you can turn off your water at the main water shut-off valve. See How to Shut Off Your Home Water Supply if you need help locating the main shut-off valve. Remove the lid of the toilet tank and flush the toilet. You’ll want to hold the toilet handle down so that as much water as possible drains from the tank and the bowl. Remove any water left in the bowl with a sponge or use a water solidifier to temporarily solidify the remaining water. You can also use a plunger to force most of the remaining water in the bowl down the drain and sponge out the rest.
A wet/dry shop vacuum empties toilet tanks and bowls quickly. Check the manufacturer’s instructions for how to set it up for suctioning water.
Step 2: Detach the Toilet
Detach the water supply line hose from the toilet fill valve and the 3/8-inch compression nut. This will help when resetting the toilet after the wax seal is replaced. You should always consider replacing the water supply line hose when replacing the wax seal. If the toilet is caulked to the finished floor of the bathroom, score the caulking all the way around the toilet base with a utility knife. Place a protective covering on the bathroom floor or bathtub, depending on where you’ll be placing the toilet while changing the wax seal.
Remove the caps that cover the bolts and washers. This can be done by inserting a flathead screwdriver under the edge of each cap and gently prying upwards. If the bolts have corroded, first apply penetrating oil and allow it to seep over the threads for a few minutes before loosening the bolts. With an adjustable wrench, apply only moderate pressure to loosen the bolts. Anything more may bend or break the toilet anchor flange. Be careful not to apply too much pressure on the porcelain because it may chip or crack. Remove the nuts and washers from the bolts at the toilet base using the adjustable wrench. If the bolt spins as you turn the nut, you’ll have to grasp the bolt with a separate pair of pliers while removing the nuts. If you aren’t planning on installing new bolts, nuts and washers, store the existing ones so they don’t get lost.
With your toilet out, you have the opportunity to replace it, if needed. Check out How to Replace a Toilet for instructions and tips.
Step 3: Move the Toilet
Before lifting the toilet, place four 2-inch-by-4-inch-by-6-inch-cut dimensional lumber blocks on top of the floor covering, to hold the toilet drain off the floor. Choose a corner of the bathroom away from the drain to give yourself room to work. Angle the blocks slightly so they won’t tilt as you rest the toilet on them.
Grab the toilet under the sides of the bowl and rock it gently back and forth to break the old wax seal. Carefully lift the toilet while keeping the base parallel to the floor and set it down on the blocks. If you’re working in a tight space or the toilet appears too heavy to lift, consider removing the bolts attaching the tank to the bowl and moving the two parts separately. Check the drain on the toilet to make sure the old wax ring isn’t still attached before you set the toilet on the blocks.
It’s hard to empty everything from the drain trap that loops from the bowl to the floor drain opening. That’s fine as long as the toilet base remains upright, but tilting it back and forth can spill water from the trap all over your floor.
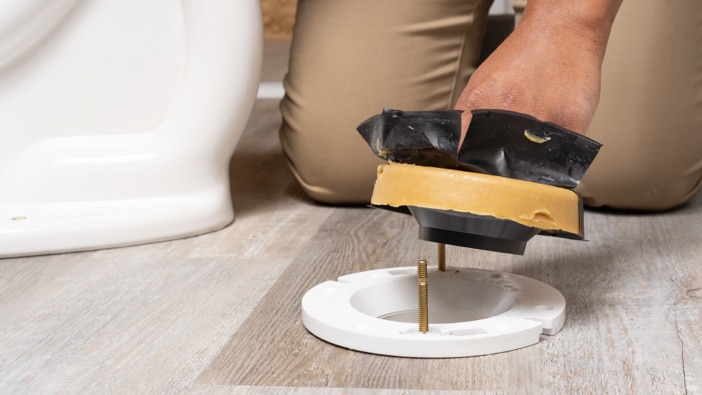
Install the New Wax Ring

Before toilet wax ring installation, prep the toilet flange and address any floor damage.
Step 1: Remove the Existing Wax Ring

Wear a pair of waterproof cleaning gloves to remove and discard the old wax ring. Scrape the old wax seal off the base of the toilet and toilet flange using a putty knife. Scrape any caulk off the toilet bowl and finished flooring. Inspect the toilet flange for any cracks or decay. If there are none, proceed with the new installation. After you remove the old wax ring, immediately plug the drain with a ball of rags or an old towel large enough that it doesn’t fall into the pipe. An unplugged drain can allow noxious sewer gas to enter your home.
Step 2: Replace the Toilet Flange Bolts
If you’re installing new toilet bolts, put them in place now. If you’re keeping the existing bolts, make sure they’re in good condition before putting down the wax. Make sure the bolts are centered with the toilet flange opening and parallel with the finished wall behind the toilet tank. Install any repair parts or spacers as needed before inserting the new toilet mounting bolts.
If a toilet isn’t anchored down, it can tip over. A broken flange means a useless anchor bolt, so use a toilet flange repair kit if you notice leaks or wobbles.
Step 3: Attach the Wax Ring and Position the Toilet

Place the new wax seal on top of the toilet flange and make sure it’s centered. Reinstall the toilet by using the johni bolts as a guide. Make sure you hold the toilet as level as possible when placing it onto the new wax seal. The toilet tank should be parallel to the wall behind it. Don’t rock the toilet as you set it onto the new wax seal. Use a slight side-to-side twisting motion until the toilet bowl is resting on the finished bathroom floor.
Step 4: Bolt the Toilet Back Into Place

Install the washers and bolts in the order and location they were removed. Tighten the johni bolts a little at a time while alternating from side to side until the toilet bowl is sitting firmly and evenly on the finished floor. Don’t overtighten the bolts, or you could damage or crack the toilet bowl. Saw off extra bolt length, if needed, and then add the decorative caps.
Once you’ve learned how to install a toilet wax ring, explore How to Fix Common Toilet Problems.
Step 5: Reconnect the Toilet and Check the Toilet Wax Ring
Apply fresh plumbers tape to the tank inlet threads and attach the water supply line to complete the project. Turn the water on and allow the tank to fill before flushing. Place tissues around the entire bottom of the toilet bowl where it meets the finished floor and flush the toilet several times. If you notice water on the tissues, the wax seal isn’t properly installed, and you’ll have to remove the toilet and start the installation over with a new wax seal. As a precaution, check the base of the toilet for leaks an hour after flushing it and again the next day to make sure the ring has formed a waterproof seal around the drain.
Step 6: Seal the Toilet With Caulk
If you don’t see any leaks, seal the toilet bowl to the finished flooring with caulk while only leaving a small 1-inch observation opening in the back of the bowl facing the wall. If water is ever coming from this small opening, you have a leak. The source of the leak should be identified as soon as possible before floor damage occurs.
Let's Get Started

If you have a leak at the base of your toilet, you may only need to replace the wax ring or repair your toilet flange. We'll show you how to do it in a few simple steps.
If you've discovered that a new toilet is needed, shop for a new one online or visit your local Lowe's store. We'll explain how to install it or you can choose to have us professionally install it for you.
Toilet Repair FAQ
Here are some of the most frequently asked questions about toilet repair.
Why Use a Wax Ring?
Wax resists mold and bacteria while retaining its sealing ability after years of use. Made from a molded wax loop around a short plastic tube, wax rings are durable, inexpensive and adaptable to fit almost any toilet and floor drain.
How Do I Fix a Leaky Toilet Flapper?
Once you drain the toilet tank and disconnect the water supply, it’s a good time to replace the flush valve. Fixing a leaky flapper can save hundreds of gallons of water a day. To test the flapper before turning off the water, tint the water in the tank with food coloring and let it sit for 10 minutes. If any colored water leaks into the bowl, replace the flapper. If you also want to replace the toilet handle while you’re at it, check out our article on the topic.
Why Does My Toilet Wobble From Side to Side?
If your toilet rocks enough for one side of the base to lift off the floor — even just a bit — you may have a broken toilet flange. Repair the flange for your toilet with a flange repair kit.
How Often Should I Replace the Wax Ring on a Toilet?
Anytime you remove or replace a toilet for any reason, you should always change the wax ring and replace the flange on the toilet.
How Do I Know What Size Wax Ring To Buy for My Toilet?
Wax rings come in two diameters: 3 inches and 4 inches. If you’re not sure what size wax ring to buy, measure the opening on the bottom of your toilet bowl. The wax ring should be the same size as the width of the opening.
Can You Replace a Wax Ring Without Replacing the Toilet?
Yes, you can replace the wax ring and reinstall your toilet as long as there are no structural damages to the toilet.
Do All Toilets Use the Same Wax Ring?
No, you need to make sure the wax ring you buy is the right size for your toilet or you run the risk of developing leaks.