
Tools and Materials
Tools
Materials
See Project Diagram for materials
- 2-1/2-in Deck Screws
- 1-1/4-in Deck Screws
- #10 x 1 1/2-in Flathead Sheet Metal Screws
- Oil-Rubbed Bronze Spray Paint
- Wood Stain
- Satin Polyurethane
Items may be Special Order in some stores. Product costs, availability, and item numbers may vary online or by market. Paint colors may vary slightly from those shown. Availability varies by market for lumber species and sizes.
Instructions

Before starting on your table and benches, obtain the pipe fittings in advance to ensure you’ll have adequate materials on hand to begin.
Make the Base
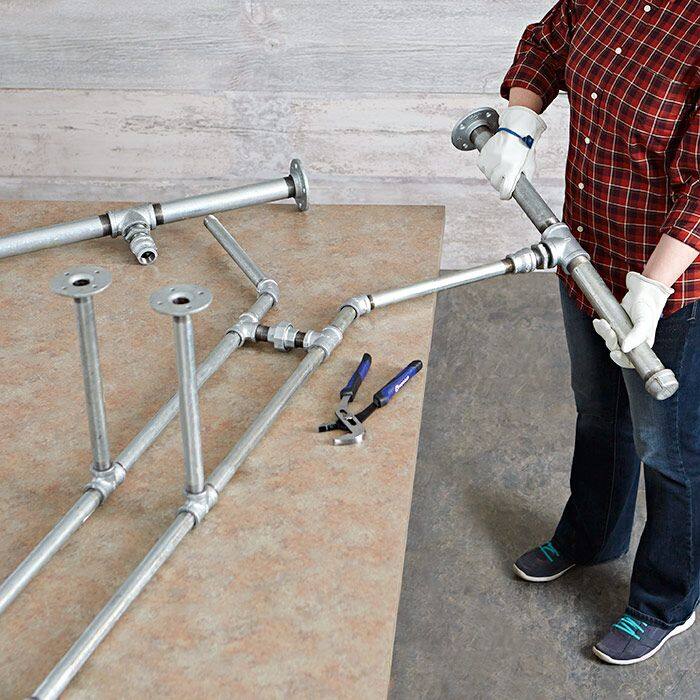
Organize the pipes and fittings needed to begin the table on a large work surface (Pipe-Frame Table Project Diagram, Cutting List and Drawing 1).

Thread a 3/4-inch 45-degree galvanized elbow onto a 3/4-in x 4-in galvanized pipe. Continue joining the fittings and pipes as shown (Pipe Frame Table Project Diagram, Drawing 1). Repeat for the second half of the connector assembly. The fittings should just be hand tight for now -- they will be tightened further in a later step.
Disassemble the two 3/4-inch union joints and screw each close nipple halfway into a tee fitting on the two halves of the connector assemblies. These fittings should be very loose at this time (Pipe-Frame Table Project Diagram, Drawing 1).
Join the two halves of the connector assembly with the union joints. You may need to tighten or loosen the assemblies to get them to line up. Once the threads on the two union joints start threading together, tighten all of the remaining joints until the parts are both aligned and snug.
Make a Leg
Making a leg begins with 1 1/4-inch and 3/4-inch galvanized pipe parts (Pipe-Frame Table Project Diagram, Cutting List). Lightly thread a 1 1/4-inch cap onto one end of a 1 1/4-in x 12-in galvanized pipe (Pipe-Frame Table Project Diagram, Drawing 2). Add a 1 1/4-inch tee to the other end, and a second 1 1/4-in x 12-in galvanized pipe to the opposite end of the tee fitting. Complete the main portion of the leg by threading a 1 1/4-inch pipe flange to the end of the 12-inch-long pipe.
Into the remaining opening in the tee fitting, thread a 1 1/4-in x 1-in reducer bushing, followed by a 1-inch close nipple, a 1-in x 3/4-in reducer coupling, and a 3/4-in x 12-in pipe (Pipe-Frame Table Project Diagram, Drawing 2).
Once the parts are together, start tightening the assembly as a group versus one piece at a time. Repeat for the three remaining leg assemblies (Pipe-Frame Table Project Diagram, Drawing 2).
Complete the Base
Thread the four legs into the 3/4-inch elbows (Pipe-Frame Table Project Diagram, Drawing 3).
Tighten as many fitting as possible and square the framework. This works best by flipping it upside down and spacing the center 3/4-inch flanges off the work surface with a scrap 1 x 6. When complete, there still may be a loose fitting or two. As you secure the base to the top, it will become very strong.
Make a Top
Cut five 2 x 8 boards to 84 inches long for the top slats (A) (Pipe-Frame Table Project Diagram, Cutting List). Cut the three table cleats (B) from a 2 x 6, and cut the spacer (C) from a 1 x 6. Sand the boards with 120-grit sandpaper -- a power sander is recommended.
Because this project is built with galvanized pipe, it can be used indoors or out; use pressure-treated boards as an alternative material for the wood components for outdoor use.
Place the top slats (A) on a work surface and position the middle cleat (B) so that it is centered on the bottom face of the top, (Pipe-Frame Table Project Diagram, Drawing 4). Once centered, drill countersunk pilot holes and secure the cleat to the slats with 2 1/2-inch deck screws.
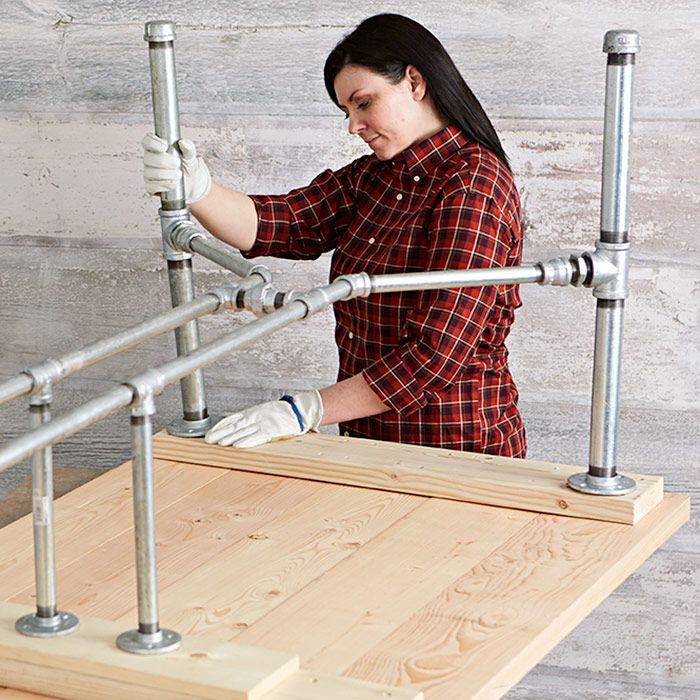
Position the center the spacer (C) on the middle cleat, and the two remaining cleats (B) on the top. Rest the table base on the top (Pipe-Frame Table Project Diagram, Drawing 5) and adjust the pipe frame until it rests squarely on the top. Adjust the final position of the cleats (B) and spacer under the leg flanges.

Remove the base and spacer (C) and secure the cleats (B) to the slats (A) with 2-1/2-inch deck screws.
When working with framing lumber, you may need a clamp to hold the boards tight to each other to make the top. Instead of using one long clamp, you can use two shorter clamps to help pull the boards together.
Final Assembly and Finish
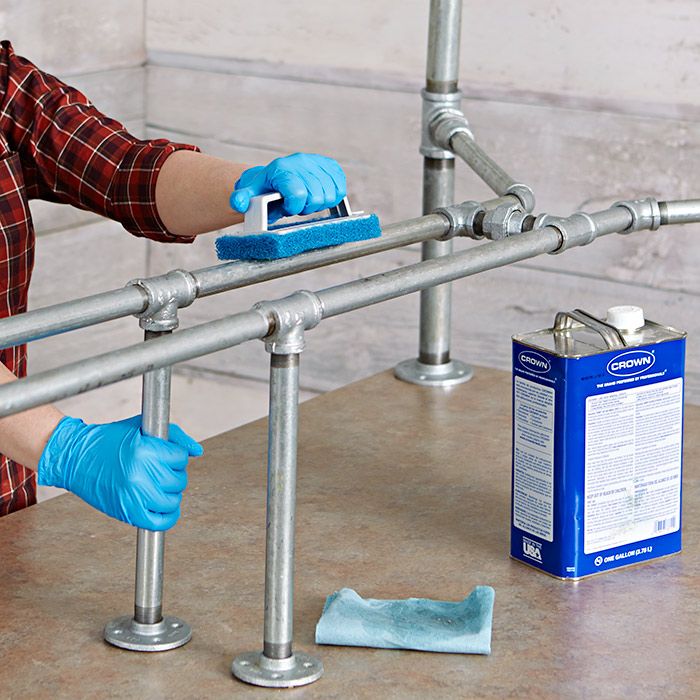
Scrub the pipes and fittings with mineral spirits or trisodium phosphate (TSP) using a scouring pad; let dry. In a well-ventilated area, spray the metal parts with paint following the manufacturer’s instructions.
Remove the screws from the cleats and apply a stain and protective polyurethane finish to all of the boards following the manufacturer’s instructions. When the finish is complete, reassemble the components (Pipe-Frame Table Project Diagram, Drawing 5) and secure spacer (C) with 1-1/4-inch deck screws. Use #10 x 1-1/2-in flathead sheet metal screws to secure the flanges to the top assembly to complete the table.
The table can be made shorter or longer by substituting pipes of a different length in the base assembly. If you want to add a foot in length to the table, substitute two 24-inch pipes for the 18-inch pipes. If the specific length pipe is not available, a Lowe’s associate can cut and thread the pipe for you.
Make a Bench Base
The bench legs utilize 1-inch and 1/2-inch galvanized pipe parts (Pipe-Frame Bench Project Diagram, Cutting List). Organize the parts to make the two benches.
For the connector assembly (Pipe-Frame Bench Project Diagram, Drawing 1), thread a 45-degree elbow and a close nipple into both ends of a 1/2-inch tee fitting. Thread a 1/2-in x 18-in pipe in the remaining opening in the tee, and then add a tee to remaining end of the 18-inch pipe. Repeat for the remaining end of the connector assembly. Now add a 1/2-in x 6-in pipe and 1/2-inch flange to the center tee. Repeat for the second bench.
Lightly thread a 1-inch cap onto one end of a 1-in x 6-in galvanized pipe to begin the legs (Pipe-Frame Bench Project Diagram, Drawing 2). Add a 1-inch tee to the other end and a second 1-in x 6-in galvanized pipe to the opposite end of the tee fitting.
Into the remaining opening in the tee fitting, thread a 1-inch close nipple followed by a 1-in x 1/2-in reducer coupling and 1/2-inch close nipple. Tighten all of the fittings.
Thread the leg assemblies into the 45-degree elbows to complete the two bench bases. Turn all of the fittings until the bench bases are tight (Pipe-Frame Bench Project Diagram, Drawing 3).
Make a Bench Seat
Cut six 2 x 6 boards to 52 inches long for the top slats (A) and cut the cleats (B) and pipe cleats (C) from 1 x 4 boards (Pipe-Frame Bench Project Diagram, Cutting List). Sand the material with 120-grit sandpaper -- a power sander is recommended.
Place the top slats (A) on a work surface and center the middle cleat (B) on the seat slats. Drill countersunk pilot holes and drive 1 1/4-inch deck screws (Pipe-Frame Bench Project Diagram, Drawing 4).
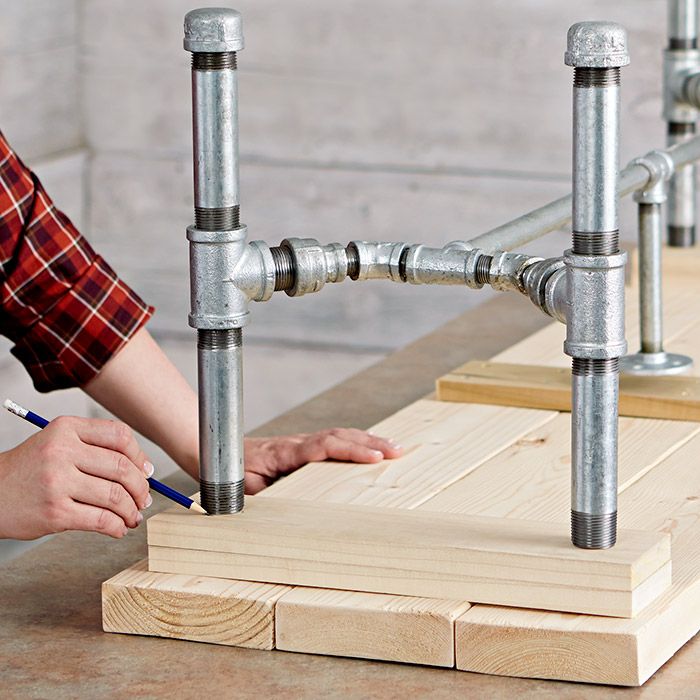
Set the remaining cleats in position and position the bench base on the top centered on the middle cleat (B) (Pipe-Frame Bench Project Diagram, Drawing 5). Adjust the final position of the loose cleats so they are centered under the legs and mark around the pipes for holes to be drilled into the pipe cleats (C).

Remove the bench base and pipe cleats (C) and secure the end cleats (B) to the slats (A). Mark the center point of the holes for the legs within the circles you marked earlier. Drill the holes with a cordless drill and a spade bit.
Final Bench Assembly and Finish
Scrub the pipes and fittings with mineral spirits or trisodium phosphate (TSP) using a scouring pad; let dry. In a well-ventilated area, spray the metal parts with paint following the manufacturer’s instructions. Apply stain and a polyurethane finish to the wood parts following the manufacturer’s instructions.
For an alternate metal finish, your choices range from distressed to industrial chic. You can also apply an alternate wood finish.
Reassemble the bench tops using screws and secure the pipe cleats to the end cleats (Bench Project Diagram, Drawing 5). Add construction adhesive to the holes in the pipe cleats and slide the bench bases into the holes. The center flange should now rest on the cleat in the middle of the bench. You may need to tighten or loosen the center pipe and flange so they touch the middle cleat. Secure the flange with 1 1/2-inch wood screws. When the adhesive is dry, the benches are complete.
Make shorter benches by substituting shorter pipes and shorter top slats. If you want to make the bench top 6 inches shorter, for example, you will need to cut 3 inches from each 18-inch pipe. If a specific pipe is not available, a Lowe’s associate can cut and thread pipes for you.