
Tools and Materials
Slat Wall Paneling 101


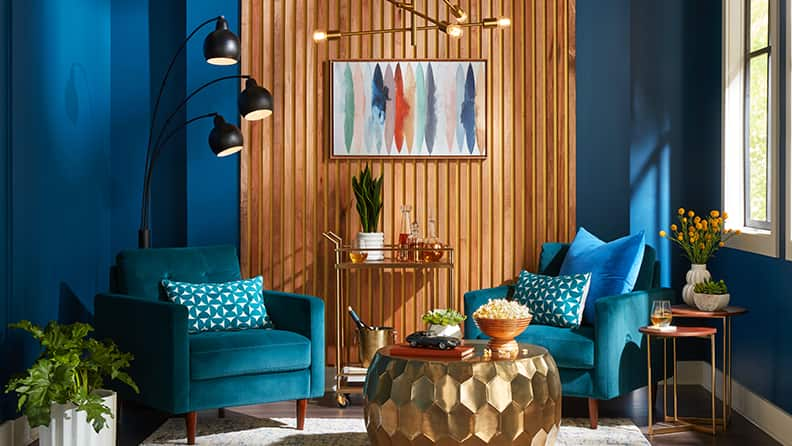
Even though fluted wall paneling looks great and adds striking texture to a room, there’s a reason you don’t see a lot of it. Slat wall paneling costs a couple of hundred dollars a linear foot. You can get a similar look, cheaper, with pole wrap paneling. But the best way to mimic the look of the high-end fluted wall paneling is with individual slats of wood. We’re going to show you how to do just that, so you get a gorgeous fluted wall at a fraction of the cost. It’s easier than it looks and makes a harmonious, contemporary accent wall in any room of your home.
Our DIY slat wall paneling is made of slim, vertical strips of wood that run from floor to ceiling. They’re attached to the wall with nails. The slats range from ½-inch wide to 2-inches wide, depending on the look you’re going for. You can buy 1-inch-by-2-inch slats and work with those, or if you feel confident in your woodworking skills cut larger pieces of wood to the desired size.
The spacing between the slats can vary as well. Make sure the space you leave between the slats is less than the width of the slats. You want more wood to show than wall. For this project, we placed 2-inch-wide wood slats 1-inch apart.
The paint color behind the slats is important since it shows through the gaps between the wood. Paint it a dark color to add drama and depth. We chose Valspar’s Noir in a matte finish.
Instructions
Here's what you need to know to build slat wall paneling. The project should take you less than a day. The cost will vary based on the size of the wall. We did a 10-foot by 10-foot wall and it cost about $300. We used basic tools to do the job.
1. Remove the Baseboard.
We installed our slats flush with the floor to give our fluted wall paneling an elegant floor-to-ceiling look. To remove the baseboard, work a putty knife between the top edge of the baseboard and the wall, loosening the nails that hold it in place. Use a pry bar to remove the baseboard from the wall.
2. Paint the Wall.
Paint the wall a dark color to contrast with the slats. Plan on applying two coats. We used an interior black latex in an eggshell finish to reduce glare and add visual depth to our wood slat panel.


3. Measure the Height and Width of the Wall.
Calculate how much wood you will need for your fluted wall paneling, based on strip width and spacing. We used furring strips for our project because they’re the most affordable option. You can go with a softwood lumber but it will be more expensive, adding to the overall cost of your DIY wood slat wall panel.
4. Cut Slats So They’re Long Enough To Run From the Floor to the Ceiling.
Measure at different intervals along the wall because your ceiling height may vary in different spots. Ceilings are not always perfectly level, and you’ll need to account for those slight variations in your wood cuts. Aim for a snug fit between slat and ceiling so your fluted wall paneling looks like a pro did it. Wear eye and hearing protection while running the saw.
5. Sand the Wood Slats.
Sand slats one at a time to remove splinters from all edges and surfaces. Wear gloves and eye protection while working.
6. Stain or Paint the Wood Slats.
Stain or paint the front and both sides of each slat. Don’t worry about the backs looking perfect, they’ll be attached to the wall and out of sight. One coat of stain should be sufficient for a light color, but you may need a second coat for a darker color.


7. Attach Wood Slats to the Wall.
Use a brad nailer to attach the slats to the painted wall. For the first slat, use a level so you position the slat straight on the wall. After that, use a spacer to keep the gaps between the wood slats consistent as you go across the wall. A spacer is an object you place against the slat you just nailed on the wall to measure where to put the next slat. We used a scrap piece of wood.
Attach all your slats. Use the putty knife to fill nail holes with wood filler in a hue that matches your stain. You’re done. You’ve made a wood slat wall panel for a fraction of the showroom price.