
Why Drill a Pilot Hole?


Drilling a pilot hole is a quick, key step for several reasons. Predrilling can prevent damage to your wood or other material from splitting or shredding, especially if you’re placing the fastener near an edge. It can keep a screw from “walking” when you try to insert it into a material with a slick surface, like melamine or medium-density fiberboard (MDF). Walking refers to the tendency of a drill bit to move or skid across the surface of the material when you first start drilling, rather than staying in the exact spot you intended. When drilling into hard materials, like pressure-treated lumber, a pilot hole will reduce the stress on your drill. Pilot holes also reduce the chance of cracking your screw or stripping the screw head. Additionally, a pilot hole can make sure you’re driving the screw in the right direction and leave a smoother, more professional look.
Pilot holes can be useful in any case, but if you’re going to use a fastener in a soft material, like pine board, then predrilling may not be necessary.
How Do I Choose the Right Drill Bit for a Pilot Hole?

Choosing the right drill bit size for your pilot hole isn’t complicated, but it’s particularly important. A pilot hole that’s too small will run the risk of splitting the wood — exactly what you want to avoid. And one that’s too large won’t allow the screw threads to grip the wood. Here are some guidelines to help you choose the proper drill bit size:
- For screws, pick a bit that matches the inner diameter of the screw, not the full screw diameter with the threads included.
- For nails, use a bit that's slightly thinner than the diameter of the nail’s shank.
When deciding on a bit or bit set, it’s good to know the chuck size of your drill — 1/4, 3/8 or 1/2 inch, for example — to ensure a proper fit for bit shank.
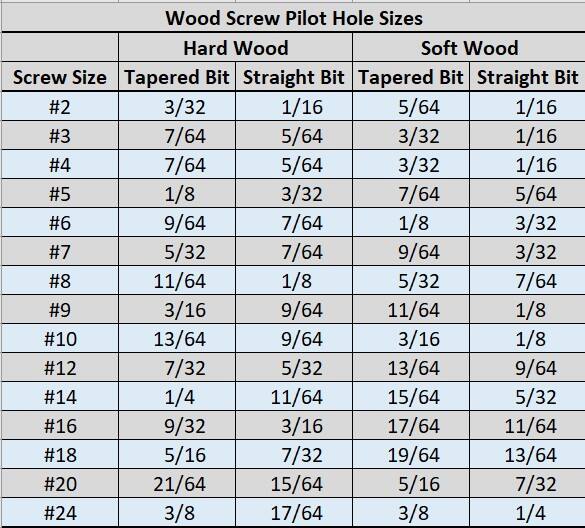
Wood Screw Pilot Hole Sizes
Drilling Your Pilot Hole

Follow these easy steps to drill a pilot hole.
Step 1: Measure and Mark the Pilot Hole Location

Mark the location where the fastener will go. Using a tape measure or ruler, measure across the workpiece from one edge to the other and from one end to the other, making short lines at the intersection point. This intersection is the center point for the pilot hole.
Step 2: Install the Drill Bit in the Chuck

Turn the chuck — the part of the drill that holds the bit in place — counterclockwise to open. Fully seat the bit in the chuck. Tighten the chuck completely, making sure the bit is centered and not crooked.
Wear eye protection when using a drill/driver. Follow the tool manufacturer’s instructions for use and safety.
Step 3: Drill the Pilot Hole
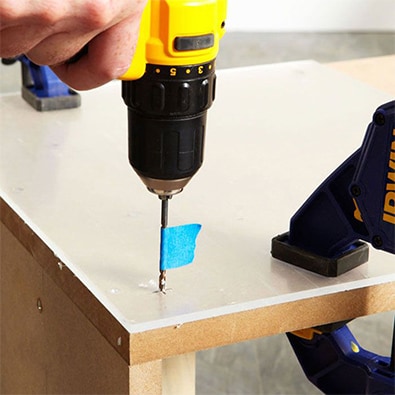
Set the drill/driver direction to forward and grip it with your forefinger on the trigger. Align the drill perpendicular to the surface, with the tip of the drill bit on your mark. Start slowly by gently pulling the trigger and then squeeze the trigger harder to accelerate. Drill only as deeply as needed, typically the length of the screw.
To keep the bit from walking or skidding across a slick surface, like melamine, take a hammer and nail and make a small dent in the material at the drill point. The bit can sit in this to get started.
Step 4: Clear the Drill Bit
With the drill bit slowly spinning, slowly back the bit out from the hole. Take care to keep the drill straight to avoid making the hole wider than you intended. Brush away any dust and debris from around the hole before setting your screw into the material.