
Tools and Materials
Product costs, availability and item numbers may vary online or by market.
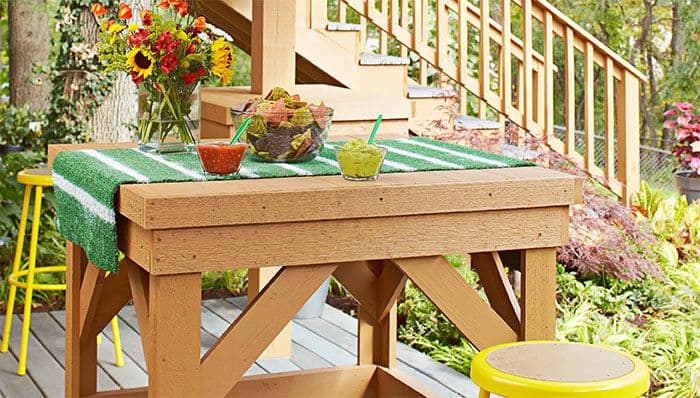
Benefits of an Outdoor Bar Table
Whether you call it a pub table, a bar table or just an outdoor table, this project makes any outdoor space the right place for casual dining, conversation, entertaining and more.
- It’s large enough to seat four but compact enough to maximize your space.
- The bar height creates a casual feel whether you’re with family or friends.
- The natural wood adds beauty and warmth to any deck or patio and you can customize it with a stain that complements your home or creates an eye-catching focal point.
- Building this table can be a great next step for do-it-yourselfers and woodworkers with the experience to move from beginner projects to builds that can teach them intermediate skills and techniques.
Choosing Lumber for Your Table
We built this pub table with cedar lumber. In addition to simply being a beautiful wood, cedar is great for outdoor projects, with natural rot and insect resistance. Depending on your location, you may be able to swap the cedar for redwood to get a different look with similar insect- and rot-resistance.
Whichever lumber you choose, make sure the screws you use are suitable. Many types of deck screws have a coating that works with a variety of lumber types.
Building the Table
Follow these steps to build a deck and patio pub table.
Build the Table Top


As these diagrams show, the table top includes the aprons (B), cleats (C) and rails (D). Wood slats (A) form the table top. The rails stabilize the top and support the slats. The cleats provide attachment points for the rails and the braces you’ll connect to the legs.
Instructions


Build the Leg Assembly

You’ll assemble each leg from two boards (E and F). The stretchers (G) stabilize the legs and keep them square to each other. The braces (H and I) provide additional stabilization of the legs against the underside of the table top. Note in the second diagram that you’ll need to cut the braces to complementary angles so they fit properly. See Project Diagram, Drawing 4 for details on these cuts.
Instructions


Finishing Up

Add trim to the aprons (J) and attach foot rails (K and L) to the stretchers as shown in this diagram. The apron trim covers the ends and edges of the slats and gives the table top a finished look. The foot rails help protect the stretchers from wear.
Instructions

Setting Up Your DIY Bar Table
Once you’ve completed the table, it’s time to put it to use.
First, add seating. You can go with any stools that are suitable for outdoor use or you can dress up the table with outdoor bar stools that complement your space.
Place settings can be as simple or as decorative as you want. Choose from everyday dinnerware, formal dinnerware, dinnerware for holidays and more. Don’t forget placemats to protect your new table and, for extra elegance and flair, a table runner or tablecloth. Need some tips? We’ve got tablescape ideas to get you started; just adapt them to the outdoors and whatever look you want.
Make outdoor dining and entertaining even better with the right additions to your space. Container plants add living beauty. Mix and match plants and planters to create a subtle look or a bright, colorful display. Outdoor décor like fountains, bird baths and bird feeders can add motion and sound. Keep the entertaining going when the sun goes down with solar-powered lanterns, string lights and, when the weather is cool, a crackling fire pit nearby.