

Tools and Materials
Product costs, availability and item numbers may vary online or by market.
Deciding to Refinish Your Floor


Refinishing solid 3/4-inch hardwood is a good DIY project. To see if you have solid hardwood flooring, look inside a vent, or along a baseboard to determine which flooring you have.
Engineered Hardwood Flooring
Engineered is layered, as opposed to solid hardwood. Some engineered hardwood can't be refinished. It depends on the thickness of the veneer wear layer. Due to its layered construction, refinishing engineered wood should be left to the pros.
Solid Hardwood Flooring
To determine if your solid hardwood floor needs to be refinished, place a few drops of water on it. If it beads or soaks in slowly over a few minutes, you can probably just clean and polish. If the water soaks in immediately, you’ll need to refinish. If your floor is damaged or stained, or there’s wax over the finish, you’ll need to sand to bare wood.
Refinishing Guidelines
-
When you're sanding a wooden floor, always start with a coarse grit paper — generally, nothing higher than 60-grit to start — and move to finer grades as you go. If your floors require a drum sander (and you’ve chosen to do this task yourself), you’ll use an orbital sander for the edge. Make sure you’re using the same grade sandpaper on both tools. Swap the sandpaper grades for both once all areas have been sanded with the current grit.
-
Use wood putty or wood filler for any holes in the floor once you’ve finished sanding.
-
If you’re staining your floors, test the stain in an inconspicuous spot to make sure you like how it looks before you apply the first coat.
-
Make sure you start staining in a direction that leads you to the exit of the room so you can get out without walking across wet stain.
-
When bringing furniture back into the room, avoid sliding the furniture across the floor. Felt pads can help prevent scratches, too.
- Generally, traditional hardwood floors can be refinished up to 10 times. To help prolong your floor’s lifespan, sweep and mop regularly and be careful when wearing hard-soled shoes.


Preparing to Refinish Your Floor

Step 1: Clean the Room
Start by taking everything out of the room where you’ll be refinishing the floors, including curtains, pictures and register covers.
Step 2: Remove Doors and Shoe Moulding
Using a pry bar, carefully pry the shoe moulding from the wall. Make sure to label the shoe moulding and use painters tape to mark the corresponding wall. For rooms without shoe moulding, you can either remove the baseboard or use extra caution when sanding near the walls. Take any doors off their hinges.
Step 3: Inspect the Floor
Closely inspect the floor before refinishing, driving in any raised nail heads. If you’re ripping up the carpet, remove the carpet staples underneath. These fasteners will tear the paper on the hardwood flooring sanders.
Step 4: Clean the Floor
Use a vacuum and/or a mop to remove any dirt and debris on the floor.
Step 5: Add Protection Against Dust
Sanding gets really dusty. Turn off the A/C and cover the air vents, lights, windows and doorways with plastic. If possible, put a fan in the window to blow the dust outside.
It's important to wear an appropriate mask or respirator when working with a sander.
Step 6: Sand With the Last Size Grit
Do a third pass with 100-grit sandpaper. This will be the final sanding pass. Afterward, vacuum thoroughly with a brush attachment. Use a damp mop on the floor to pick up any remaining particles.
Step 7: Clean the Floor
If the floor feels rough after sanding, buff it with a 120-grit screen. Buffing with a screen will smooth out fine scratches. Work along the grain, getting as close as possible to the walls. Use a sanding screen for the edges and corners, too. Finish up with a thorough cleaning — windowsills, walls, etc. It’s a good idea to go over the floor with a cloth dampened with mineral spirits.
Check local fire regulations for disposal instructions.
Sanding Your Floor
Follow our seven-step process to sand your hardwood floor.
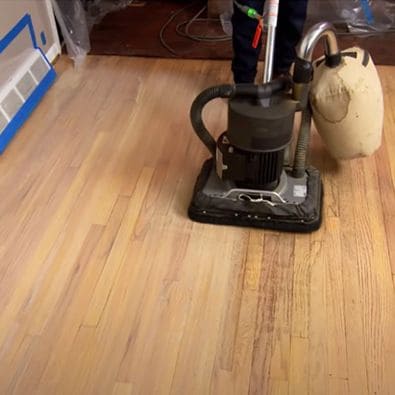
Step 1: Sand the Center of the Floor
With the room prepped, you’re ready to sand. Use a random-orbit sander for flat floors. It’s easier to handle, and the random sanding pattern won’t leave directional scratches on the floor. Floors that are cupped and wavy require a drum sander. It’s best to call a professional for that.
Load the machine with coarse, 40-grit sandpaper. Start it up and immediately begin moving — letting it run in one spot will damage the floor. It’s easiest to work along the grain to see where you’ve sanded. When you get to the end, move over and pull back, slightly overlapping the first pass by a few inches. Continue sanding, getting close to the edges.
Make sure you wear safety gear and don't let the orbital sander bag fill more than halfway.
Step 2: Sand the Edges of the Room
After you’ve sanded the center of the room, do the edges using a power hand sander with paper of the same grit. In the corners, use a detail sander.
Step 3: Vacuum
After sanding, vacuum thoroughly with a brush attachment.
Step 4: Sand With the Next Grit
Before you sand with the next grit, fill in deep gouges and holes with matching wood filler. Also, draw light pencil marks a few feet out along the edges. This will help you see where you’ve sanded, as hardwood flooring sanders remove pencil marks. For the second pass with the sander, use a medium, 60-grit sandpaper. Also, use 60-grit paper with the hand sander along the edges and the detail sander for the corners.
Never skip more than one grade of coarseness for each sanding.
Step 5: Vacuum
Clean up the dust with a vacuum and brush attachment.
Step 6: Sand With the Last Size Grit
Do a third pass with 100-grit sandpaper. This will be the final sanding pass. Afterward, vacuum thoroughly with a brush attachment. Use a damp mop on the floor to pick up any remaining particles.
Step 7: Clean the Floor
If the floor feels rough after sanding, buff it with a 120-grit screen. Buffing with a screen will smooth out fine scratches. Work along the grain, getting as close as possible to the walls. Use a sanding screen for the edges and corners, too. Finish up with a thorough cleaning — windowsills, walls, etc. It’s a good idea to go over the floor with a cloth dampened with mineral spirits.
Check local fire regulations for disposal instructions.
Using Wood Stain

Staining is only needed if you want to change the floor color. Follow these general instructions for staining. Stain according to the manufacturer’s directions.
Step 1: Apply a Pre-Stain Conditioner
Apply a pre-stain conditioner.
When applying stains and any stain related products, start at the farthest corner from the door and work towards it, so you don’t trap yourself in the room.
Step 2: Apply the Stain
Stain in the direction of the wood grain using a foam applicator, making sure to work in manageable sections.
Step 3: Remove Excess Stain
It’s generally recommended to remove any excess stain within the first few minutes after application. This can be done with clean cotton cloths or paper towels. Check the manufacturer’s directions to see if they have a preferred material or method for removing the excess.
Step 4: Allow Stain to Dry
The stain should be completely dry before you apply any wood finish.
Using Wood Finish or Polyurethane
Polyurethane wood finishes can be water- or oil-based. Oil-based finishes provide a more durable seal. Water-based options dry faster. Follow these instructions for using polyurethane.
Step 1: Apply Sanding Sealer
If you’re not staining, apply a sanding sealer before the polyurethane finish. Let it dry and then lightly sand it with 320-grit sandpaper.
Step 2: Vacuum and Clean
Vacuum the entire room again and clean the floor with a tack cloth. It’s important to have a dust-free floor.
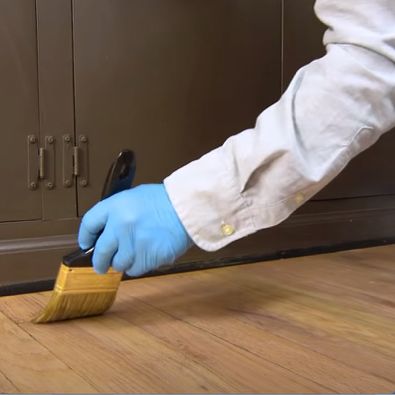
Step 3: Apply Polyurethane Finish
Complete the project by applying a polyurethane finish with a natural bristle brush and stain pad applicator. Stir the polyurethane thoroughly (no shaking) and apply it along the edges using smooth strokes. You don’t want any bubbles. For the center of the floor, use the stain pad applicator. Always maintain a wet edge and avoid creating bubbles.
Polyurethane has a strong odor. Make sure your home is well-ventilated. Also, some polyurethanes have an amber tint, so make sure you get the correct one for the desired look.
Step 4: Apply a Second Coat
Let the polyurethane dry according to the manufacturer’s directions and apply a second coat. Some products don’t require sanding between coats.
It’s generally recommended to apply a third and even a fourth coat of polyurethane. This enhances the floor’s durability and creates a glossier finish (if you choose one with a gloss finish). There are also matte options available.
Step 4: Reattach the Shoe Moulding
After the final coat has dried for a few days, you can reattach the shoe moulding. Return any furniture to the room, taking care not to slide it across the floor.
Floor Refinishing Safety
Before starting any refinishing project, it’s important to take note of any safety precautions to avoid harm or damage to yourself and your home. Below are some general guidelines to follow to safely refinish your floors.
- Wear protective gear, like a dust mask, safety goggles and ear protection while you work. This is especially important if you’re using a drum sander. Make sure to follow manufacturer’s instructions when using a drum sander to avoid injury and damage.
- Create a well-ventilated work space. If the room has windows and/or doors, open those to give fumes and dust a way to escape.
- Cover any vents and grates to keep dust caused by sanding from recirculating in your home
Conclusion
If your hardwood floors are looking worn and faded, it's time to refinish them.
Refinishing your wood floors protects the surface, so they'll last longer. It also improves the overall resale value when it's time to sell your home.
Here are the basic steps to refinishing a hardwood floor.
Step 1: Prep Work
This involves cleaning the room, removing the moulding and covering vents, doors and windows.
Step 2: Sand the Floor
This is a seven-step process that involves cleaning, sanding and vacuuming.
Step 3: Stain the Floor
You'll need to apply pre-conditioner, followed by the stain. Remove the excess stain and allow it to dry.
Step 4: Apply Wood Finish or Polyurethane
Finally, you'll apply a sanding sealer. Vacuum and clean the floor. Apply two coats of finish and let it dry. Then reattach the shoe moulding.
Are you ready to get started? Purchase the tools and materials online or from your Lowe's store and we'll deliver them.
Frequently Asked Questions

These answers to common questions will help you plan your refinishing project.
How Can I Make My Wood Floors Look New Again?
Hardwood floor refinishing is the best way to make your floor look new again. Refinishing takes off the top worn layer of your floor to refresh its natural beauty. Reapplying the finish and staining and sealing the wood brings back its warmth and luster to make it look as good as it did on the day it was installed.
Is it More Affordable to Sand and Refinish Hardwood Floors or Replace Them?
It's almost always cheaper to refinish your hardwood floors than it is to replace them. If you replace flooring, you’ll have to invest in new hardwood, as well as labor for installation and removal of the old hardwood. When refinishing, you don't have to worry about those costs.
However, you'll need to take the condition of your floor into account. If your hardwood floor is badly damaged, warped or cracking, it's better to replace the flooring. Refinishing flooring damaged by water or rot can worsen the issues and it will ultimately be cheaper and safer to replace the hardwood.
How Often Should Hardwood Floors be Refinished?
In general, hardwood floors need to be refinished every seven to 10 years. If you find sizeable areas of water damage, stains, scratches and dents, fading or discoloration, it’s time to refinish your floors. For 3/4-inch thick hardwood floors, you can refinish them up to six times in their lifespan.
What Is the Most Popular Hardwood Floor Stain Color?
Popular hardwood stain colors are those that give light brown, gray or whitewashed looks to your floor. Darker, cooler shades and two-tone combinations are also increasingly popular.
Does Refinishing Floors Add Value?
Yes, refinishing your hardwood floors adds value to your home. You'll generally recoup twice the money you put into refinishing your floors when you resell your home.