
Tools and Materials
Product costs, availability and item numbers may vary online or by market.
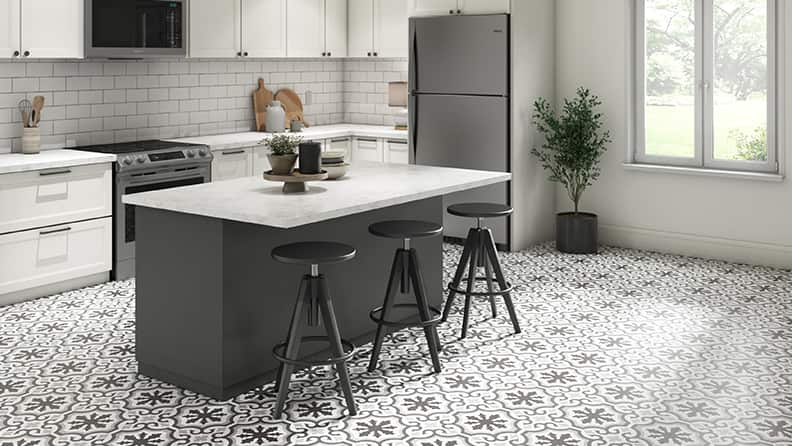
Why Peel-and-Stick Vinyl Flooring?


-
Peel-and-stick vinyl flooring is a quick and easy do-it-yourself project that can be done in a weekend. Once you finish the layout work, it's a simple matter of peeling and sticking. Peel-and-stick vinyl flooring is available in tiles or planks.
-
Self-adhesive floor tiles come in various thicknesses, colors and patterns that replicate a stone or porcelain tile floor.
Estimating Material Needs

-
To compute how much flooring you'll need for a project, measure the length and width of the room and multiply these numbers to find the area of the room.
-
For example, if the length of the room is 12 feet and the width is 10 feet, the total area will be 120 square feet. If necessary, divide irregularly shaped rooms into smaller sections. Figure the area for each section and add them all together to get the total.
-
Finally, to determine how many cartons you'll need, divide the square footage to be covered by the square footage contained in a carton. For our example above, if the carton holds 15 square feet, you'll need 8 cartons (120 / 15 = 8) plus extras (about 10%) to make up for waste and for future replacements.
To determine how much flooring you’ll need for your project, use our Vinyl Flooring Calculator.
Preparing Floors for Vinyl Flooring

-
Peel-and-stick vinyl flooring expands and contracts over time. To acclimate new flooring, place the open boxes in the room where you’ll install it. Leave the flooring in the room for at least 48 hours or the amount of time indicated in the product recommendations. Be sure to follow any product-specific instructions for installation temperature ranges.
-
Remove all trim from around the floor. If you intend to reuse it after installing your new flooring, pull any nails through the trim from the back side. This step reduces splitting, so you can use the trim again.
-
Your new installation is only as good as the underlying floor, so proper surface preparation is important. Clean the floor thoroughly. The surface must be smooth and free from debris, grease or wax. Uneven floors, bumps or dips can cause blemishes that’ll show over time.
-
Check the subfloor with a level to ensure it has a flatness tolerance of no more than 1/16-inch over a six-foot length.
Concrete or Ceramic
Vinyl flooring can be installed over concrete if the concrete is clean, smooth and dry. Repair any holes or cracks. You can sometimes even out raised spots using a coarse-grit abrasive on a belt or disc sander. Any minor bumps can be removed with a cold chisel driven by a small sledgehammer. Be sure to wear safety glasses.
Vinyl Flooring
You can install vinyl tile or planks over old vinyl flooring that’s in good condition. If the old floor has a rough texture or some dents and dings, smooth on a skim coat of embossing leveler with a straight edge trowel. This creates a smooth surface and prevents the new flooring from eventually taking on the texture of the old floor. Remove damaged or loose vinyl flooring.
Floors Requiring Underlayment
If removing the old floor is too difficult or impractical, and the floor is too damaged to use an embossing leveler, cover it with a new layer of plywood underlayment. Unless otherwise directed by code, 1/4-inch plywood that’s graded BC, meaning the face is graded B and the interior and back side are graded C, is a good choice for flooring underlayment.
Always wear a respirator when removing old flooring. Be aware that some older flooring materials may contain asbestos. It's recommended that you test older flooring materials before removal, and have a professional remove them.
Don’t install peel-and-stick vinyl tile or planks over flooring that’s been treated with varnish, sealant, paint or anything similar. Never add additional adhesive to self-stick flooring. This can void the warranty and cause a chemical reaction, resulting in the tile or planks not sticking.
Layout of the Floor Area
Floor tiles or planks are best centered in the room at a doorway for visual appearance. You may want to use a prominent window instead. Keep this in mind when you lay out the flooring in your room.
Step 1: Measure the Room

Measure to find the center of two opposite walls. Use these points to snap a chalk line across the length of the room in the center of the floor, dividing the room in half. Then snap another chalk line perpendicular to the first so the two lines cross in the center of the room. Check where the lines cross with a carpenter's square to make sure they're square. Watch our DIY Basics video: How Do I Use a Chalk Line?
Step 2: Lay the Flooring
Trial-fit a row of tiles or planks down both lines to the width and length of the room. (Don't use adhesive or peel off the protective backing yet). By laying out the flooring in this way, you'll get an idea of any adjustments that need to be made to your original reference lines. You want to work with as many full tiles or planks as you can. Also, you want to end up with at least half a tile or plank width in the areas where the flooring meets the walls. Adjust the reference lines as necessary to achieve a satisfactory layout.
Installing Peel-and-Stick Vinyl Flooring
Follow these steps to install vinyl tile and planks.
Step 1: Lay the Flooring

Now it’s time to remove the backing and secure the tiles or planks to the floor. Begin laying them from the center of the floor where your two adjusted reference lines cross. Start by laying a tile or plank at the intersection of the lines. Then use the lines as a guide as you work your way outward toward the walls in each quadrant.
Keep a trash can nearby and discard the peel-and-stick backing as you go.
Step 2: Cut and Add Flooring
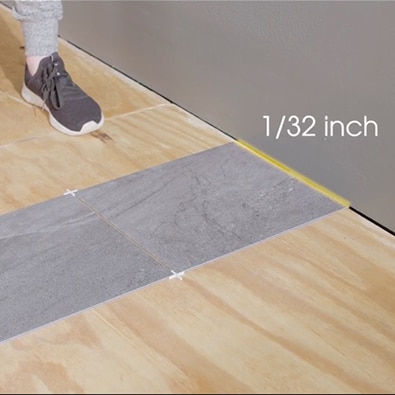
After laying all the whole tiles or planks that’ll fit, begin cutting and adhering them to fill around the perimeter of the room. To ensure an even gap for the perimeter pieces or cuts, first measure and mark with the pencil. Then score and snap the flooring to fit, maintaining a 1/32-inch expansion gap at the perimeter.
Step 3: Cut and Fit

For flooring that simply need to be cut to length, place the tile or plank directly on top of the last full piece near the wall. Place another piece against the wall, overlapping the loose tile or plank. Mark and cut the first loose piece using the overlapping flooring as a guide. The cut tile or plank will then fit against the wall. Once you complete each row, remove the tile spacers.
For irregularly-shaped flooring, make cardboard templates first to prevent waste.
Step 4: Use a Roller

After you’ve installed several rows of flooring, apply pressure and roll over them with a floor roller or rolling pin to bond them firmly.
When you must kneel on freshly laid flooring to continue with the installation, put a piece of plywood between yourself and the tile or planks. It’ll distribute your weight and reduce the possibility of individual pieces slipping.
After Installation
Follow these instructions to finish the job.
Step 1: Clean Up
Clean the surface with a wet cloth to remove any adhesive.
Step 2: Add Trim
Re-secure trim and molding to the walls.
Step 3: Let It Dry
Keep off the new floor for 72 hours while the adhesive sets.
Don't have time to do this project yourself? Check out our professional vinyl floor installation service.