
Tools and Materials
Product costs, availability and item numbers may vary online or by market.
Replacing Your Old Cabinet Pulls


If you want to swap out your present cabinet pulls with new hardware similar to what you currently have, the installation is very simple. Just follow these steps to update your cabinets and drawers.
Instructions

Installing New Cabinets Pulls and Knobs

If you’re wanting to change out your cabinet pulls for something new and different; the process is similar to the one-to-one swap mentioned above. There are a few additional steps you will need to do to ensure a quality installation. See the following steps to see how easy it can be to get a new look for your cabinets.
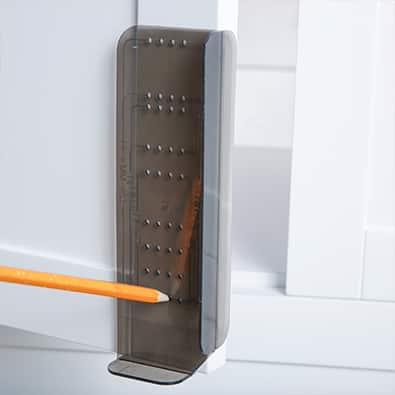
How to Measure Cabinet Pulls

In changing out your hardware, you may want to go from one length of pulls to another of a longer length, or maybe go from a pull to a knob. This graphic shows how to use the center-to-center measurement to see if you will need to drill new holes in your door or drawer.
Instructions


Frequently Asked Questions
Here are answers to some frequently asked questions on how to install cabinet pulls.
What is Standard Spacing for Cabinet Pulls?
A center-to-center measurement of 3-3/4-inches is the most common cabinet pull size. Cabinet and drawer pulls sizes can run from 2-1/2-inches up to 12-inches center-to-center.
What is the Rule of Thumb for Cabinet Hardware?
A good rule of thumb for cabinet hardware is the 1/3 rule. This means to select a cabinet pull that is 1/3 the height of your cabinet doors or 1/3 the length of your cabinet drawers. If you’re in between sizes, use the next biggest size. Visually, your eye will follow the lines up the height of the door or horizontally along the width of the drawer.
How Do You Install Cabinet Pulls Without a Template?
Installing pulls without a template is hard but possible. Here are some steps to help you do it.
- Place a wide strip of masking tape along the cabinet door edge.
- Measure 2 to 3 inches up from the bottom of the cabinet door and mark this spot.
- If the door has a frame (or stile) measure the frame center point at the mark you just made.
- This cross point is the center of your pull.
- Measure or check the package for the center-to-center pull measurement.
- Divide the center-to-center number by 2 to get the above and below measurements for the mounting hole locations and mark on the tape.
- Example: For a 3-1/2-inch pull, you would measure 1-3/4-inches above and below for your pilot holes.
- Double check your measurements with the actual pull.
- Drill your holes and install the pull.