

Tools and Materials
Tools
- Compound Miter Saw or Circular Saw & Blades
- Drill/Driver & Bits
- Tape Measure
- Rafter/Speed Square
- Saw Horses
- Staple Gun & Staples
- Tin Snips
- Digging Shovel & Transfer Shovel
- Spading Fork
- Garden Rake
- Garden Trowel
- Garden Hose & Nozzle or Wand
- Soaker Hose
- Hose-End Irrigation Timer
- Work Gloves
- Safety Glasses
- Hearing Protection
- Respirator
Product costs, availability and item numbers may vary online or by market.
How to Create a Raised Bed
Building and planting a raised garden bed is an intermediate-level DIY project that generally takes a day or so to complete. It’s helpful to have some experience with DIY work and be familiar with basic carpentry. Here’s what you’ll need to do:
- Plan the site for your raised bed.
- Cut the lumber for the raised bed to size.
- Assemble the planter box for the raised bed.
- Fill your raised garden bed with soil and plants.
We’ll show you each of the phases of the project below and give you some tips for planting your raised garden.
Raised Garden Bed Essentials
The work will go more quickly if you have the right tools and materials ready to go. Here are the key items you'll need.
Key Raised Garden Bed Tools


Key Raised Garden Bed Materials


DIY Raised Garden Bed Location
Before you learn how to construct a raised bed, pick a spot for your DIY raised garden bed. Keep in mind many types of plants — including vegetables — need plenty of sun, so make sure your raised bed garden layout maximizes sun exposure for them. Take a look at our article and videos on designing and planting a vegetable garden for tips on choosing a good location for your raised garden bed.
Building the Garden Bed


The bed frame can be as simple as 2-by-4s on top of the ground, or even patio retaining wall blocks. The size is up to you. A bed that’s at least 6 inches high provides ease of access and gives roots plenty of room to grow. These instructions describe using untreated 2-by-4s to build a bed that’s 4 feet by 6 feet by 10-1/2 inches in size. Untreated lumber isn’t rot-resistant, but it’s a good option for edible plants that you can help protect from moisture with the right prep work.
Step 1: Cut the Raised Bed Frame Boards to Length

Measure and mark the length of the walls and cut the boards. Measure and cut 2-by-4s for corner posts to support the walls. They should be the height of the garden bed wall. You can also cut posts to install along the walls for additional strength.
For our frame, we cut six 6-foot boards, six 3-foot by 9-inch boards and ten 10-1/2-inch support posts. You can build this bed with ten 10-foot 2-by-4s.
Step 2: Attach Corner Posts for the Raised Bed Frame
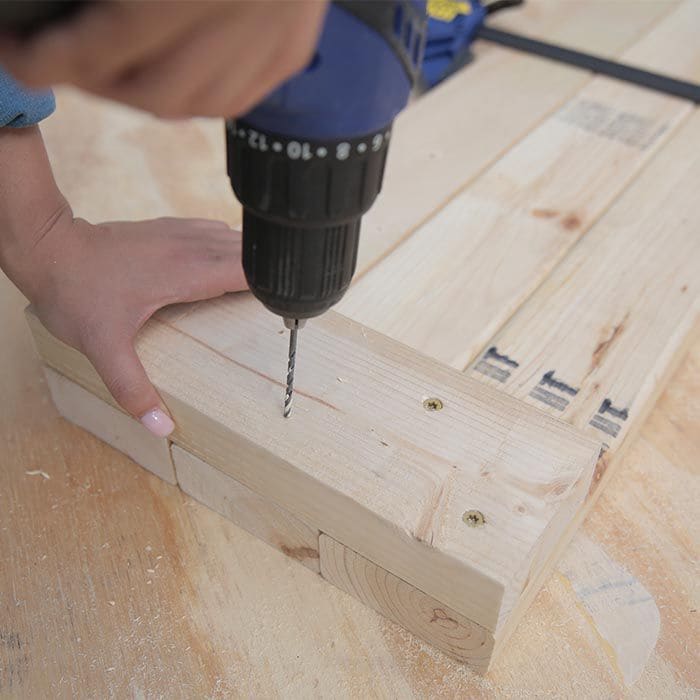
Clamp together the boards for each wall. Set the corner posts on top of the wall boards, flush with the ends of the 6-foot walls and set back 1-1/2 inches from the ends of the shorter walls. Drill pilot holes and attach the posts with screws. If you cut additional posts, attach them as well.
Step 3: Build the DIY Raised Garden Bed Planter Box
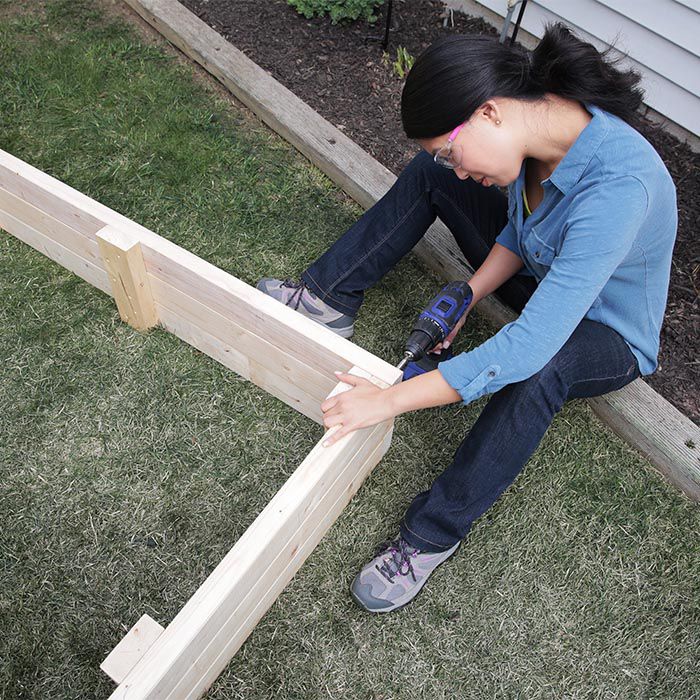
Drill pilot holes and connect all the sides with screws to form a box. The posts should be on the inside of the bed.
Preparing the DIY Raised Garden Bed Location
Mark the raised garden bed outline and remove the grass from the area. You can then add the finishing touches to the raised bed frame.
Step 1: Outline the Raised Garden Bed Area

Place the frame in position and outline it with a shovel. Setting up the bed on the ground rather than a hard surface — such as concrete — allows proper root growth and drainage.
A raised bed frame is heavy and unwieldy. Enlist a helper when it’s time to move it.
Step 2: Remove the Grass From the Garden Layout Area

Set the frame aside to remove the grass. Loosen the dirt with a spading fork to help your new plants' roots grow deeply into the ground.
Step 3: Attach Hardware Cloth to the Raised Bed Frame

Before you set the bed in place, staple wide-mesh hardware cloth to the bottom of the frame. The mesh help will help keep weeds out but still allow earthworms in to enrich the soil. As an alternative to hardware cloth, you can consider using landscape fabric or even newspaper to block weed growth from below, but keep in mind that weed seeds can fall onto the soil and germinate.
Step 4: Line the Raised Garden Bed With Plastic Sheeting

If the wood isn’t rot-resistant, staple heavy-duty plastic along the inside walls before adding the soil.
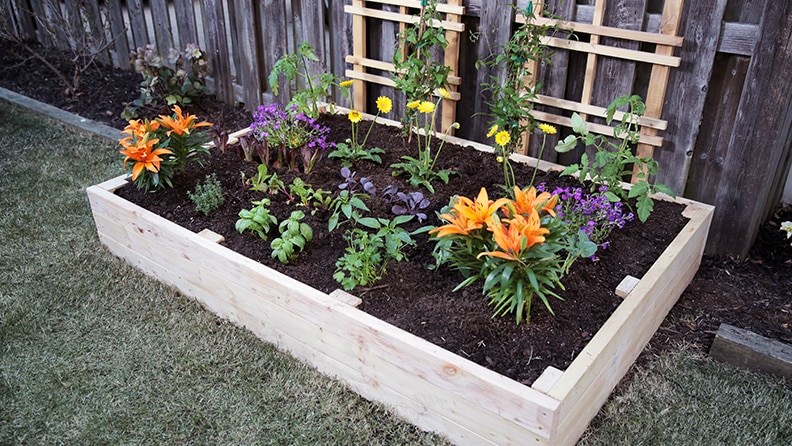
Add Soil and Plant Your Raised Garden Bed
Start with high-quality soil and choose plants that will work in the location you select. Plant tags show details on the care and conditions the plants need to thrive. See our guide to reading a plant tag to learn how plant tags can help you plant and grow a garden.
Step 1: Fill the Raised Bed With Soil

Fill the bed with a mix of nutrient-rich soil and compost. Use our Mulch and Soil Calculator to estimate the amount you need and see our article on soil and soil amendments to learn how to improve your soil. You can also buy bagged raised garden bed soil to make filling the bed easier and give your plants the best start.
Step 2: Plant Your Raised Garden Bed

Set the plants in holes and lightly fill in with soil. Keep the soil loose around the plants to allow water to reach the roots.
If you use container plants, gently break up the root balls before planting.
Watering Your DIY Raised Garden Bed

Morning is the best time to water your plants since less moisture will evaporate in the sun. Read our watering tips for more ideas and check the plant tags for additional recommendations.
A water timer on a soaker hose can make a simple task like watering even easier. Drip irrigation can also be an efficient way to get the right amount of water exactly where you need it.
Raised Garden Bed Ideas
Raised Garden Bed Kits: An Easy Way to Grow

If you like the idea of a raised garden bed, but don’t have the time to measure and cut lumber or you simply want a different design, consider purchasing a raised garden bed kit. In addition to wood raised garden bed kits, there are other options:
- Metal raised bed garden kits create a rustic or farmhouse look.
- Composite raised garden bed kits offer the look of wood, are weather-resistant and require little maintenance.
- Plastic raised garden bed kits resist the elements and are available in a variety of colors.
Raised Bed Garden Layout
Plan your raised bed layout to maximize the space, give plants the sunlight and space they need and make it easy to care for. Here are a few raised bed garden layout ideas:
- Keep your tall plants and climbing plants at the back so they don’t block sunlight for low-growing varieties.
- Arrange low-growing plants near the front so they get plenty of sunlight and are easy to reach.
- Keep spreading plants at the edges so they spill over instead of taking up precious space in the raised bed.
- Consider dividing your planter into squares and creating individual planting blocks, each one for a different type of plant. You can make the most of your space and keep plants with similar care requirements together.
- Plan a layout that swaps out plantings throughout the year with seasonally appropriate crops. Use compost to replenish the nutrients in the soil.
Raised Flower Bed Ideas

Many of the raised garden bed layouts above are good ideas for raised flower beds too, and there are other raised flower bed ideas you can try:
- Create a flower garden that attracts butterflies.
- Build your raised garden bed with retaining wall block.
- Design an English-style garden with raised flower beds.
- Integrate your raised garden bed with a pea gravel patio.
- Adapt a retaining wall to function as a raised flower bed.
Raised Garden Bed Options

Now that you know how to make your own raised garden, there are a few things you can do to customize this DIY project to suit your gardening plans.
- Add a garden trellis next to the bed for vines and tall plants.
- Install a mesh cover to keep birds and rabbits away. You can build the frame with wood and polyvinyl chloride (PVC) pipe.
- If you want to get an early start on gardening or keep things growing later in the season, cover the mesh frame with plastic to protect the plants from cool temperatures.
What Type of Wood Do I Use?
The wood you choose to use for a raised bed is your decision. Here are some options:
- Cedar and redwood are naturally water-resistant but can be expensive and hard to find.
- Hemlock, fir and pine are suitable materials for raised beds but aren’t very long lasting.
- Pressure treated lumber is also an option, but it’s been a controversial topic for many years. The purpose for chemical pressure treatment is to protect wood from rot, decay and wood-ingesting insects. Chromated copper arsenate (CCA) was the most controversial treatment, and the Environmental Protection Agency (EPA) banned it for consumer use in 2003. Current treatments, such as alkaline copper quaternary (ACQ), are deemed low risk by the EPA and designated safe for use around humans, pets, plants and vegetables. Creosote-treated wood isn’t a good option for raised beds where you intend to grow vegetables.
Pressure treated lumber lasts longer than untreated wood and is available at a comparable cost. Some types are also specifically treated for ground contact. But keep in mind that even water-based treatments, such as ACQ, contain the fungicide and pesticide necessary to make them effective. Here are some practices that may address concerns about using treated lumber in raised beds.
- Let the wood dry before using it. It can take six months or longer for treated lumber to dry. You can then either paint it, seal it or choose to use it as is.
- Line the interior sides of the bed with sheet plastic or pond liner.
- Plant vegetable, fruit and herb plants near the center of the bed, a few inches away from the wood.
Guidelines
Follow these guidelines and safety precautions anytime you use pressure treated lumber:
- Use fasteners and hardware labeled for treated lumber — stainless steel or hot-dipped, galvanized screws.
- Butt lumber tightly. Pressure treated wood shrinks as it dries.
- Drill pilot holes to prevent splitting when nailing or screwing boards.
- Use wood rated for ground contact when necessary for the project.
Safety
- Wear work gloves when handling wood.
- Wear a respirator, hearing protection and eye protection when cutting wood.
- Wash your hands after working with treated wood.
- Dispose of sawdust and waste according to local regulations.
- Don’t burn pressure treated wood.
- Don’t use pressure treated wood as mulch.
Read more about pressure treated lumber and wood preservatives on the EPA website: Overview of Wood Preservative Chemicals.
What Do I Plant?

Growing vegetables, fruits and herbs in a raised bed offers several advantages over growing them in regular soil. The soil in a raised bed is looser and will drain better than it would in an in-ground garden. You can also better control soil additions, like compost and fertilizers, to suit your plants’ needs. And, because you’re putting bagged soil into the bed, you can plant immediately rather than waiting on ground soil to thaw. Here are some planting suggestions for your garden bed:
- Root Vegetables: Carrots, radishes and beets all grow well in the loose soil of a raised bed.
- Leaf Vegetables: Kale, lettuce and spinach do very well in the warm, fast-draining soil of a raised garden bed.
- Melons: Raised beds and melons work well together thanks to the loose, warm soil.
- Onions: Onions need quick-draining soil, plenty of organic matter and a long growing season.
- Tomatoes: Tomatoes love warm soil, and the loose soil aids in root-system development. You’ll need to stake or cage your plants.
- Herbs: Basil, cilantro, mint, oregano, thyme, sage and rosemary are great accents and fillers in raised beds and will complement just about any dish.