
Tools and Materials
What’s Peel-and-Stick Wallpaper?
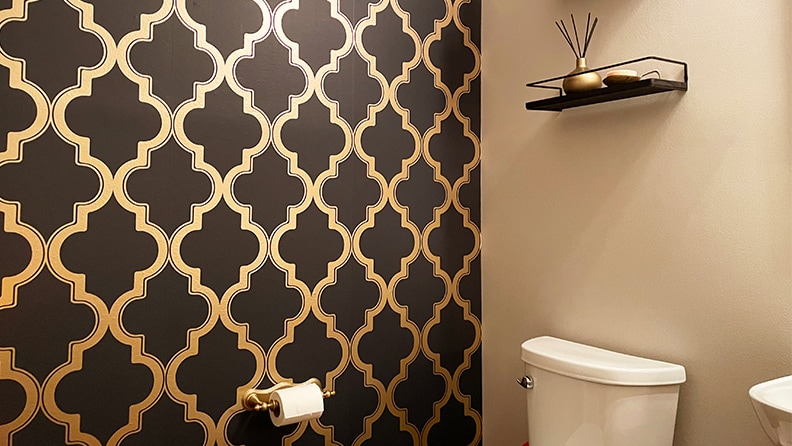
Peel-and-stick wallpaper, also known as self-adhesive wallpaper or removable wallpaper, is an easy way to update your walls. Unlike traditional wallpaper, peel-and-stick wallpaper has adhesive that’s already applied to the backing, so there’s no mixing and soaking the paper in paste. All you do is remove the protective backing and press it onto your intended surface for instant wow. We’ll show you how to do it, but always follow the manufacturer’s instructions.
Prep and Hang Peel-and-Stick Wallpaper
Before you start hanging your new wallpaper, you need to prep the room, size the paper and plan the layout. Once you’ve finished the prep work, it’s time to apply the paper to your walls.
Peel-and-stick, or self-stick, wallpaper isn’t suitable for all surfaces. Check the product information to make sure it’ll work with your walls. If you plan to take down peel-and-stick, or self-stick, wallpaper in the future, make sure it’s a type designed to be removed without damaging the walls or leaving residue.
Instructions for Hanging Peel-and-Stick Wallpaper
Step 1: Clean and Prep


To begin, clean your walls with water and a splash of rubbing alcohol. This helps remove dirt, grime and grease to ensure better wallpaper adhesion.
Next, find your starting point. To hang peel-and-stick wallpaper, you need a straight, plumb line from ceiling to floor to work from. We worked in a space where the walls are level, so we worked right to left. However, if your walls aren’t level and plumb, simply choose a mid-wall starting point and, using your level, draw a smooth, straight starting line in pencil.
Finally, measure the height and width of your walls and find comparable floor space somewhere in your home or garage. You’ll use this space to lay out your cuts and patterns prior to adhering the wallpaper.
Step 2: Unroll and Cut Your First Piece

Next, unroll the paper. Before you try to work with the wallpaper, reverse roll it to help it flatten out for easier handling.
For your first piece, account for a 1-1/2-inch to 2-inch overhang at each end of the paper. The wall for our project is 104 inches high, so we cut it to 108 inches. This allows for easier pattern matching and ensures the first piece can be pressed firmly into seams for a crisp edge. Label your first piece with a sticky note.
Step 3: Make Your Cuts and Lay Out

Measure and cut the next pieces, using your first piece as a guide. Make sure the pattern matches up and cut accordingly. Place the cut pieces on the floor and label them based on the order you’ll hang them. When you’re finished, you’ll have a floor full of peel-and-stick wallpaper cuts with their placement order clearly marked.
Step 4: Hang Your First Piece

Now that you have your design in place, it’s time to hang the paper. Beginning with your first piece, partially remove the backing and, accounting for the overhang, align the edge with your level starting line or starting wall. Press the top section into place.
Slowly begin to peel the adhesive paper away, smoothing and securing the wallpaper to the wall as you go. Use your hands or a wallpaper smoother for this step to ensure that air bubbles, creases and bends are pressed out to leave a nice flat surface. If you have trouble, lift the wallpaper from the bottom and resmooth the sheet. This is one of the signature advantages of self-adhesive wallpaper. It’s adjustable and easy to remove.
For particularly stubborn bubbles, there’s an easy solution: Use a stick pin to poke a tiny hole in the paper and press the air out with your wallpaper smoother.
Step 5: Hang the Rest of the Wallpaper

With your first piece in place, it’s time to follow the pattern you made for yourself with cuts and sticky notes. Using the same method, hang the remainder of your full-width wallpaper pieces.
You may end up with a few inches of wall with no wallpaper. If you started from the center, you may have empty space on each end of the wall. Measure the width of these remaining areas.
Step 6: Trim Extra Pieces of Wallpaper

Add a few inches to your measurements and trim the wallpaper accordingly. In this project, we needed 4-3/4 inches of wallpaper. However, we’re cutting at 7 inches to allow for overhang.
Hang the remaining pieces, using the same process as the full-width pieces, pulling the backing off the paper and smoothing it out with your hands or wallpaper tools. With your last row, you may have to use a couple of small pieces to finish the trim. The process works the same whether you have a full strip or you’re working with two smaller cuts.
Step 7: Tidy the Edges

Use the edge of your wallpaper smoother to press the wallpaper firmly into the joint where the wall meets the baseboard. Then, using a sharp utility knife or razor knife, carefully run the blade in the 90-degree angle to make a straight line. Peel the excess wallpaper away and press the newly cut edge firmly onto the wall. Use the same process along the joint between walls and again between the wall and ceiling.
Step 8: Finish Up

Clean up, decorate and enjoy the fruits of your labor — a beautiful accent wall that elevates your room from builder grade to something you’re proud to show off.