
Tools and Materials
Tools
Product costs, availability and item numbers may vary online or by market.
Why Is Gutter Maintenance Important?


Leaves and twigs can build up over time and clog your home’s gutters and downspouts. You may also notice sections of the gutters are leaking, are sagging or have separated from the house. Gutters that aren’t working correctly can allow water to damage your roof, foundation and more.
If water doesn’t flow through the gutter system, it can collect under the roofing and damage shingles, underlayment and decking. Water under the roofing can also leak into your home, damaging ceilings, walls and floors, and allowing mold growth. In winter, water trapped in gutters can freeze, forcing ice back under the edge of the shingles and resulting in leaks when the warm air under the roof melts the ice. In addition, the weight of debris and accumulated water in a clogged gutter may cause it to pull away from the roof, creating gaps. Water can then cause damage and rot under the fascia that runs along the edge of the roof.
If clogged or damaged gutters allow water to reach your home’s foundation, the water can soften the ground, leading to cracks in the foundation. A damaged foundation can create more problems inside, including damaged floors, warped door and window frames, and cracks in walls. The water can also reach your crawlspace or basement, leading to more moisture and mold problems.
While poorly maintained gutters can cause expensive problems, you can avoid damage to your home, and the cost to repair it, if you follow a couple of simple steps.
- Clean your gutters at least twice a year — once in the spring and then once again in the fall.
- Check the gutters before and after heavy rain showers to make sure they’re still clear.
Cleaning gutters is typically easiest when rain has stopped and debris has dried out for a few days. However, that’s not always an option, and sometimes you’ll have to deal with wet leaves.
Using a Ladder and Gutter Cleaning Safety

The best way to access your gutters is with a ladder (leave working from the roof to the pros). If you’re uncomfortable on a ladder or if there are power lines near your gutters, call a professional for help.
Always set a ladder on solid, stable and level ground. Avoid standing on the top three rungs, and don't reach past the side rail or no farther than your belt buckle. Some ladders have an adjustable leg for uneven ground. Be sure to follow the safety instructions noted on the side of the ladder. For a two-story home, you’ll need an extension ladder. Use hooks to attach a bucket for tools or debris, or just drop debris onto plastic or a drop cloth on the ground. Make sure your ladder isn't sitting on the plastic. For more tips, see our Ladder and Scaffolding Buying Guide.
Wear work gloves when cleaning gutters because you may come in contact with some sharp metal. If you’re working with wet debris, consider wearing nitrile gloves under your work gloves.
Pondering a gutter repair or upgrade project? Lowe’s installation services can help.
How Do You Clean Gutters?
Here are instructions for cleaning your gutters.
Step 1: Start Near the Downspout
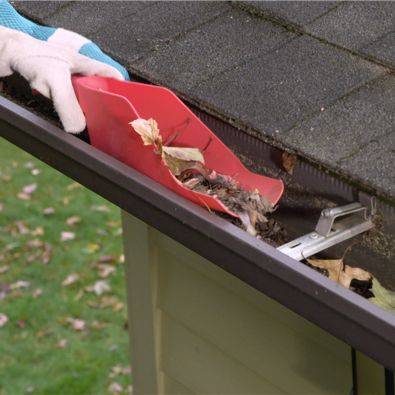
Begin by removing any material near the downspout. Also remove and clear any downspout strainers if you have them. A trowel comes in handy when cleaning packed-in and caked-on material, or you might find that using your hands works better.
Step 2: Flush Out the Gutters

Flush out the rest of the debris with a hose. A gutter cleaning attachment can be helpful too. Start at the far end and move toward the downspout. Try not to spray under the shingles as it can loosen them. If your gutter isn’t draining, you may have a clog in your downspout.
Step 3: Clear the Downspout

Flush out your downspout. If your downspout is one solid piece, take off the bands to remove it (the downspout should slide out), then flush it out with a hose and reattach. If you have a short piece of downspout running into an underground tiling system, only remove that short piece.
Step 4: Remove Clogs

Cover the open pipe leading to the underground tiling system (if you have one) with a bucket in case a lot of debris comes out. Then feed the hose nozzle up the spout, and spray at full pressure to release the clog. If that doesn’t work, try a hand auger, sometimes called a plumber’s snake. Feed the line up through the downspout. When it stops, lock the collar, and spin the line as you feed it farther into the downspout (some hand augers can be used with a drill). Then pull it back to release the debris.
Step 5: Flush the Gutters Again

Once you clear any clogs, reattach the downspout and flush the gutters again with a hose. If you notice standing water, this means your gutter isn’t correctly pitched. To fix this, detach the hangers and adjust the gutter to get the correct slope for proper water flow. Use a level to make sure it's sloping downward. The ideal slope is 1⁄4-inch to 1⁄2-inch decline for every 20 feet of gutter running toward the downspout. For sagging gutters, install additional hangers. Support hangers should be spaced every 2 feet along the gutter. It may be easier to work on small sections at a time to prevent the entire gutter system from falling.
To Replace or Add Hangers:
- Install screw and ferrule hangers by marking their position on the gutter. Then drill the holes in the gutter lip and fascia, driving the screw with a drill through the ferrule.
- Install screw-in or hidden hangers following the manufacturer’s directions. Most are attached through the rear of the gutter and into the fascia board and then clipped to the inside-front of the gutter.
- If no fascia board exists, use roof hangers with straps and follow the package instructions. Typical installation involves attaching a hanger across the gutter channel, clipping a strap to the hanger then attaching the hanger under the shingles.
Step 6: Fix Any Gutter Leaks

Repair any leaks in the gutter. For best results, make sure your gutters are completely dry. This is also a good time to clean your gutter exteriors and touch up gutters and downspouts with paint if needed.
For Specific Gutter Leaks:
- To repair leaks at the seams, make sure the gutter lengths are tight against each other, and run a bead of gutter sealant on both sides of all joints.
- To repair leaks at the end caps, add sealant along the inside of the joint.
- To repair holes in the gutter material, ask a Lowe’s associate for products designed to repair aluminum or fiberglass gutters.
Step 7: Install Gutter Guards

After your gutters are cleaned out and properly sealed, consider adding gutter guards. They’re very easy to install and keep most debris out of your gutters. There are a variety of options available. The guards we selected are designed to slide under roof shingles and can be secured with screws. Follow the manufacturer’s instructions for the gutter guards you choose.
Step 8: Maintain the Gutters
Once your gutter guards are installed, check them in the spring and fall to make sure they’re clear. If needed, brush off the tops with a small brush, and then run the hose to clear out any small debris that may have entered the system. For more help, watch our DIY Basics video How Do I Maintain My Roof?
How to Clean Gutters With a Leaf Blower
With the right attachment you can use a leaf blower to clean gutters and keep rainwater draining efficiently without the need to climb a ladder. You can also avoid much of the manual labor. Gutter-cleaning attachments can extend the reach of your blower 11 to 12 feet, so they’re suitable for many single-story houses. While some kits are designed for specific machines, you can also find kits that offer a universal fit.
General instructions for cleaning clogged gutters are below, but always follow the instructions with your kit and follow the use and safety instructions for your blower.
Use a leaf blower to clean gutters only if you have the proper accessories that allow you to work from the ground. Ensure any attachments are compatible with your machine.
Step 1: Assemble the Gutter-Cleaning Attachment
Remove the blower tube from your blower, if necessary, as directed by the instructions. Most kits include an adapter to connect to the blower, extensions that screw together and a U-shaped nozzle to direct the air into the gutters. Fit the adapter to your blower securely. Attach the extensions needed to reach the gutters from the ground. It's a good idea to have enough extensions so you can stand away from the house a bit and keep clear of falling leaves and other material. Attach the U-shaped nozzle.
Don’t overtighten the pieces during assembly.
Step 2: Clean the Gutters
Start the blower and move the nozzle along the gutters, angling it to blow away from you. Work in the direction the wind is blowing. You may need to adjust the nozzle to get the best results clearing blockages. Be careful not to damage the shingles or gutters and avoid blowing material up onto the roof.
Wear the proper safety gear while working: eye protection, hearing protection and, in some cases, a respirator or safety mask. You may want a hat or cap to keep material from the gutters off of your head.
Step 3: Disassemble the Gutter Extension
Disassemble the gutter cleaning accessory as needed for storage. If you removed the blower tube, reinstall it on your blower.
When to Repair and Replace Gutters
- Clogged Gutters: If your gutters are overflowing, they may simply need to be cleaned and unclogged using the steps above. If doing so doesn’t fix the problem, your gutters may be too small for the size of the roof or the slope of the gutters could be incorrect. Call a professional and have your gutters checked.
- Sagging Gutters: This can happen when gutters have been clogged for a long period of time and water continuously backs up. All that extra weight can pull the gutters loose from the fascia board and the overflowing water can lead to rot over time. With sagging gutters, it’s a good idea to have a pro inspect the area to see if certain sections of the gutters or fascia board need to be replaced.
- Loose Downspouts: Sometimes the fasteners that hold gutter downspouts in place can become loose. If you notice this, start by tightening the screws. If the screw holes are stripped out and you have the do-it-yourself experience to repair them, you may be able to fix this problem yourself. If not, call a pro.
- Gutter Rust: If you notice small rusty spots, you may be able to repair them with self-adhesive roll flashing if the rust isn’t too deep. If entire sections of the gutters look or feel brittle, it’s best to replace them.
If you live in a multi-story house or are uncomfortable using a ladder, it’s best to call a professional.
How Often Should You Clean Your Gutters?
If properly cared for, gutters can last up to 20 years. However, you may need to replace them sooner if they’re damaged due to falling tree branches or severe weather.