

Tools and Materials
Items may be Special Order in some stores. Product costs, availability, and item numbers may vary online or by market. Paint colors may vary slightly from those shown. Availability varies by market for lumber species and sizes.
Backsplash with Adhesive Mats


When your kitchen, bathroom or laundry room needs a refresh, consider installing a backsplash with adhesive mats. Self-adhesive tile mats free you up from traditional methods of tiling and make for easy backsplash installation. There’s less mess and cleanup and they help you get the job done quicker. One side of the adhesive mat sticks to the wall and the other side is where the tile is applied. Once the mat and tiles are attached to the wall, you don’t have to wait to begin grouting.
Double-sided tile adhesive mats replace mortar and they bond instantly, letting you apply tile and grout the same day. Tile adhesive mats can be used with most types of individual tiles up to 12 inches square or mesh-backed mosaic sheets. Use the mats on clean, flat indoor surfaces such as backsplashes, accent walls, countertops, and tub or shower walls. Adhesive mats adhere well to many surfaces, including stone, glass, ceramic, porcelain and more.


Prep Work

Good preparation ensures that the tile will adhere properly. Here are a few tips before you get started.
- Prior to installing the backsplash adhesive mat, clean the surface to remove dirt, grease, peeling paint or anything that would prohibit the mat and tile adhering properly.
- Remove any nails, hooks, etc. on the wall.
- Ensure that the surface is completely dry before installing the mats.
- Plan your tile layout by dry fitting (arranging) the tiles in the pattern you want before installing them.
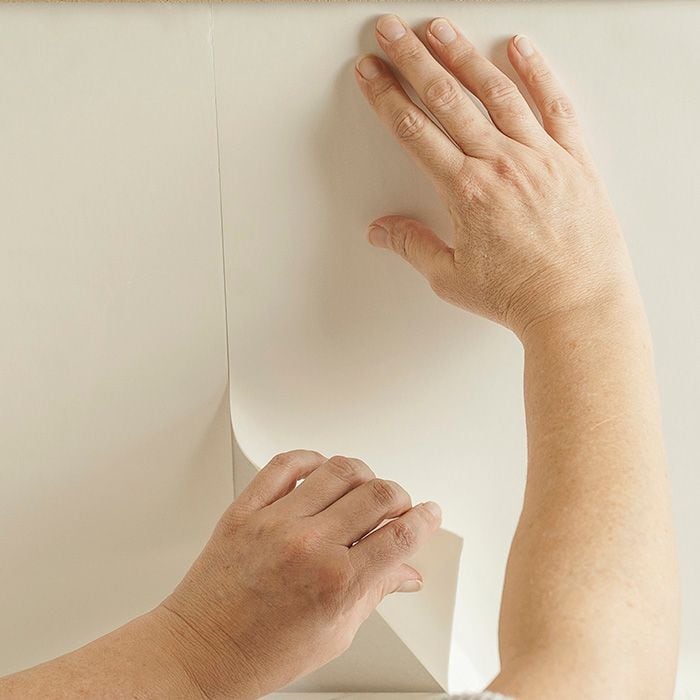
Install the Adhesive Mats


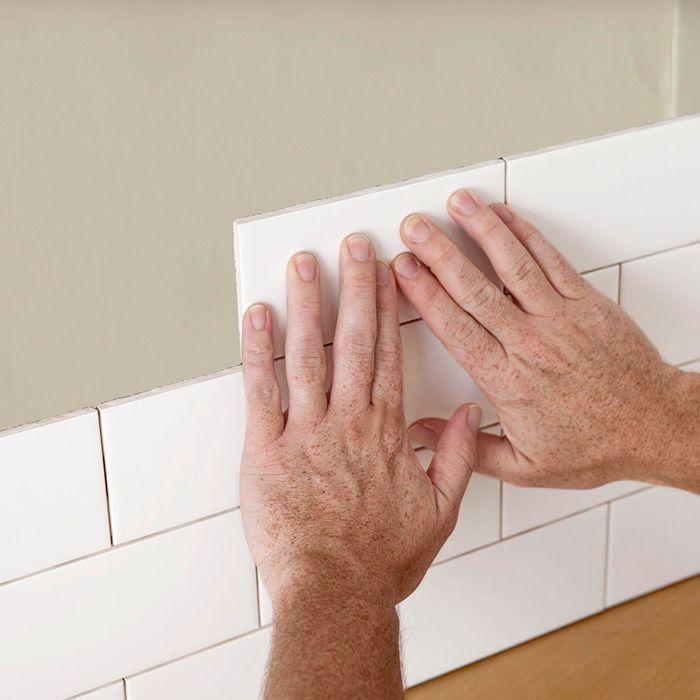
Install the Tiles

Tips for Installing a Tile Backsplash With Adhesive Mats

Follow these tips for a durable and polished finish.
- Apply the adhesive to walls that are smooth, flat and damage-free. Otherwise, the tiles won’t lay flat on the wall.
- Ensure that you use tiles that can be supported by the adhesive mat. Tiles that are large and heavy may not hold.
- Avoid using tile mats in areas with significant humidity or moisture.
Let's Get Started

If you'd like a quick and easy way to update a kitchen, bathroom or laundry room, consider a new tile backsplash. It's now an easy project when you use a tile adhesive mat. This not only saves time, but clean-up is quick and simple too.
Use a tile adhesive mat on backsplashes, tub and shower walls, accent walls and countertops. Avoid using on floors or areas that are exposed to a lot of moisture or humidity.
Installation is simple.
Step 1: Clean and patch the surface as needed.
Step 2: Measure and cut the adhesive mat.
Step 3: Apply the mat to the surface. Once it's positioned, peel off the liner.
Step 4: Lay the tile. When you have it set where you like, press firmly to activate the bond.
Step 5: You don't have to wait to grout. Spread the grout into the tile spaces. Wipe off the excess.
Lowe's has the tile and supplies you need to get started. Shop online or visit your local Lowe's store.
Frequently Asked Questions

What's the easiest way to put up a backsplash?
The easiest way to install a backsplash is to use a tile adhesive mat. This greatly reduces the amount of time invested in the project and clean-up is minimal.
How do you install a backsplash with a simple mat?
Installation is easy. Measure and cut the mat to fit the space, peel off the wall-side adhesive and apply to the wall. Smooth out any air bubbles and peel off the tile-side of the adhesive. Then carefully apply the tiles to the wall.