
Tools and Materials
Tools
Product costs, availability and item numbers may vary online or by market.
How to Choose the Right Materials for Your DIY Fire Pit
Be sure to select materials that can stand up to fire and heat. You’ll need to construct the interior of the fire pit with fire-resistant materials, so fire bricks, which are designed to stand up to direct fire, are a must. The exterior of the ring doesn’t need to be fire-resistant, but it does need to be heat-resistant. Regular retaining wall blocks are OK to use. Don’t use pea gravel or river rocks, which retain moisture and can explode under extreme heat, or any flammable materials — such as wood — even as a decorative element.
Fuel Sources
- Wood is the traditional material to burn in a fire pit. It produces quite a bit of heat and creates a charming crackling effect, like one would expect from a campfire.
- Fire logs are a good option if you like the experience of a wood fire but want an option that creates less smoke.
- Charcoal produces a slower burn than natural firewood. Charcoal also produces more heat, which can be desirable if you plan to use your fire pit as a heater for your outdoor entertaining area during colder weather.
- Gel fuel canisters contain an alcohol gel that catches fire quickly and doesn’t produce smoke or smell. However, this type of fuel usually only burns for a few hours, which may be advantageous if you only need to use your fire pit for short sessions.
Planning for a Custom Fire Pit


We built our fire pit on the lawn from regular retaining wall blocks lined with clay fire bricks, but you can also build your pit on a cement or stone patio. Rectangular blocks make it easy to adjust the layout to a size that works well for your design. Using blocks of a different style can also change the look of your fire pit.
For more fire pit ideas, check out How to Build a Fire Pit Ring and How to Build an In-Ground Fire Pit.
Before beginning any excavation, call 811 to check for underground utilities. Also, before you buy materials or begin work, check local building codes, ordinances and homeowners association guidelines to make sure that fire pits are allowed.
What’s the Ideal Size for a Fire Pit?
An interior diameter of 3 to 4-1/2 feet creates enough space for a robust fire while keeping the fire pit small enough so everyone around it can talk. This is an ideal size for two to four people. If you plan to entertain larger groups, increase the size of the fire pit. Be sure to also check local ordinances and homeowners association guidelines on fire pit size, as some areas have restrictions. Additionally, keep the fire pit small enough so that it’s at least 10 feet from structures and trees.
How Deep Should a Fire Pit Be?
A fire pit that’s 1 foot deep allows those gathering around it to see both the fire and each other. As with diameter, local ordinances may prescribe fire pit depth, so be sure to check local fire pit guidelines.
Choose a Location

For safety, choose a spot located away from your house, low-hanging limbs or anything else that could catch fire. The ideal distance is 25 feet from buildings and trees, but if your lawn space doesn’t allow for that, place the fire pit at least 10 feet away.
Make sure you’ll have enough room for outdoor furniture around the fire pit. It’s best to keep the legs of furniture about 6 to 7 feet away from the pit.
For convenience, you may want to locate your fire pit near your woodpile. Additionally, for safety, plan your fire pit so that it’s within reach of your hose and keep a fire extinguisher nearby.
Consider wind direction when planning your fire pit and avoid building it upwind from your house. Positioning the fire pit with this in mind can help keep smoke from blowing into the house when windows are open.
How to Build a DIY Fire Pit
- If you’re installing the fire pit on a paver patio with polymeric sand in the joints, you’ll need to line the bottom of the fire pit to protect the sand.
- Use fire-rated bricks cut to fit the inside of the pit.
- Cut the bricks using a circular saw with a concrete blade or a stone chisel and hammer.
If you don’t have all the tools you need, you can rent them from Lowe’s.
Select the Location and DIY Fire Pit Shape
Here are general steps for beginning work on your fire pit project.
Step 1: Mark and Prepare the Fire Pit Site
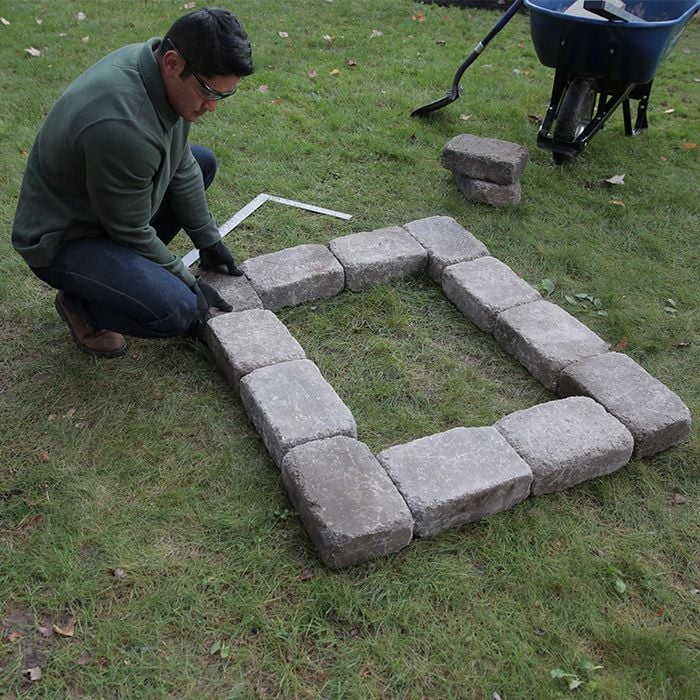
Lay out the fire pit at the location you’ve selected.
Step 2: Build the Fire Pit Base

Begin by outlining the shape of the fire pit with blocks. It’s easiest to design a layout using full-size blocks.
Step 3: Check the Fire Pit for Square

Check the layout for square and adjust as needed.
Step 4: Remove the Blocks
Mark the fire pit outline with a shovel. Remove the blocks and set them aside.
How to Install the Paver Base
If you’re building the fire pit in your yard, you’ll need a paver base to create a stable foundation for the blocks. While it may not be required for a stone or concrete patio, installing a base will still protect the surface of your patio.
What Do You Put in the Bottom of a Fire Pit?
To create a safe, sturdy foundation for a fire pit, we used a gravel paver base. Other common materials are sand, lava stones, dirt, fire glass and concrete slabs. The goal of lining the bottom of the fire pit is to create a level, stable surface for the fire pit, insulate it from cold and dampness, and keep fire from escaping.
Step 1: Remove the Sod

Using a sod lifter or shovel, remove the sod and dirt to a depth of 2 inches.
Keep the sod slightly wet if you plan to reuse it. If you plan to discard the sod, let the grass die and add it to the compost pile.
Step 2: Tamp the Soil

Tamp down the soil, keeping the area as level as possible. Adjust if needed by adding or removing soil and tamping again.
Step 3: Add Gravel

Add about 2 inches of gravel base and spread it evenly with a garden rake.
Step 4: Tamp the Paver Base

Wet the paver base and tamp it down. Then add another 1/2 inch of base and tamp again.
Step 5: Check the Paver Base

Check the paver base for level. Adjust if necessary.
How to Set the Blocks
With the paver base down, you can start placing the blocks.
Step 1: Lay the First Row

Lay the first row of blocks on top of the paver base, making sure they’re touching. Ensure the row is level and square as you’re working.
Step 2: Lay the Second Row

Lay the second row of blocks, staggering the joints with the first row.
Step 3: Mark Blocks
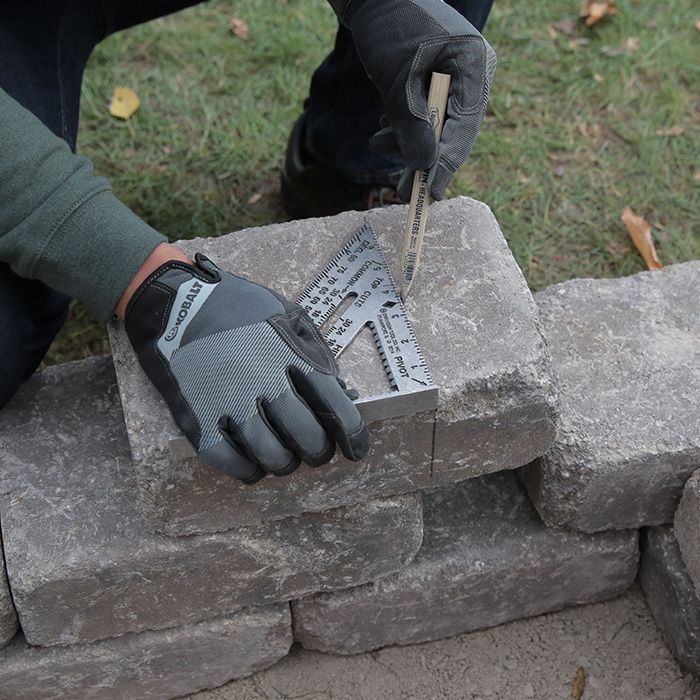
As you work, you’ll probably need to cut some blocks to fit. To cut blocks, hold them in place and mark around them.
Step 4: Cut Blocks

Cut the blocks using a circular saw with a concrete blade. If your saw blade won’t cut all the way through, use a hammer and chisel to split the blocks. See Cut Patio Block for more details.
Using a circular saw to cut pavers can make the area dusty. Consider having a helper use a shop vacuum to clear dust away while operating. Always wear appropriate safety gear.
Step 5: Apply Construction Adhesive

When the second row of blocks is in place, level and square, remove two blocks at a time, apply construction adhesive and then reposition the blocks.
Step 6: Lay the Third Row
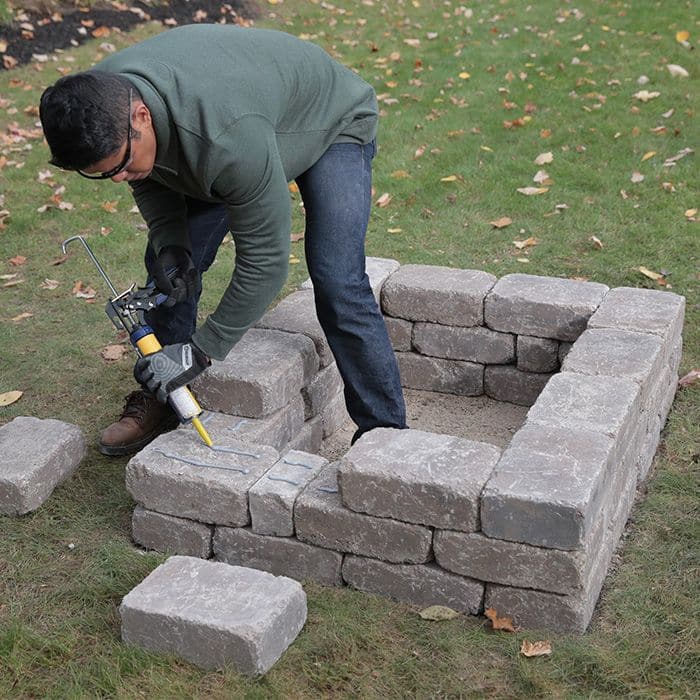
Set the third row of blocks, using the same technique used for the second row — checking for staggered joints and locking the blocks in place with construction adhesive. Allow the adhesive to cure.
Make sure the construction adhesive has completely cured before lighting a fire.
How to Install Fire Bricks
With the blocks in place, you can start working on the interior of the fire pit.
Step 1: Line the Inside
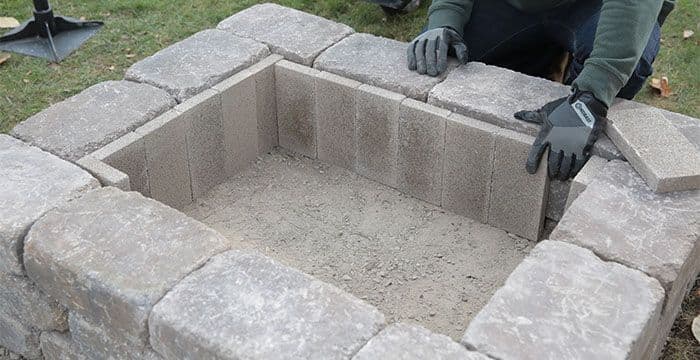
Line the inside of the fire pit walls with clay fire bricks. To align the bricks with the top of the fire pit, add more paver base, gravel or fire bricks to the bottom of the pit.
Step 2: Add Lava Rocks
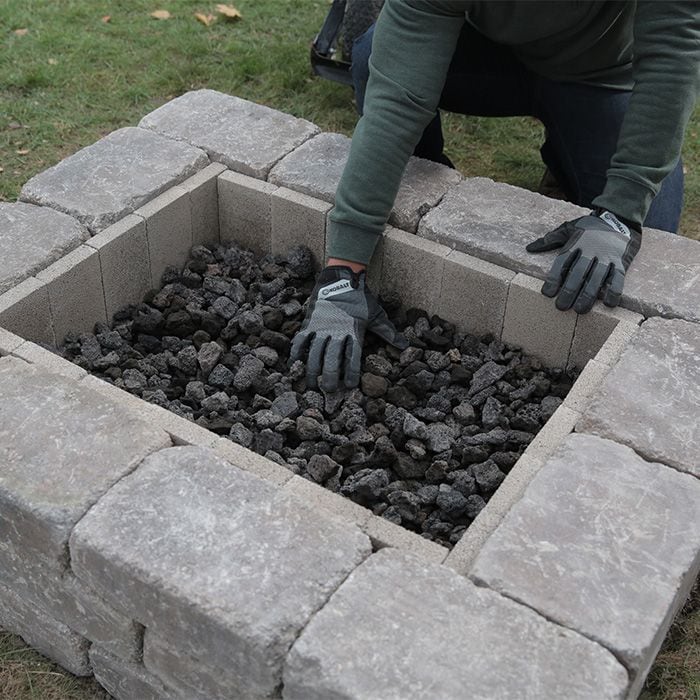
Add a few inches of lava rock to hold the bricks in place.
Step 3: Enjoy the Fire Pit
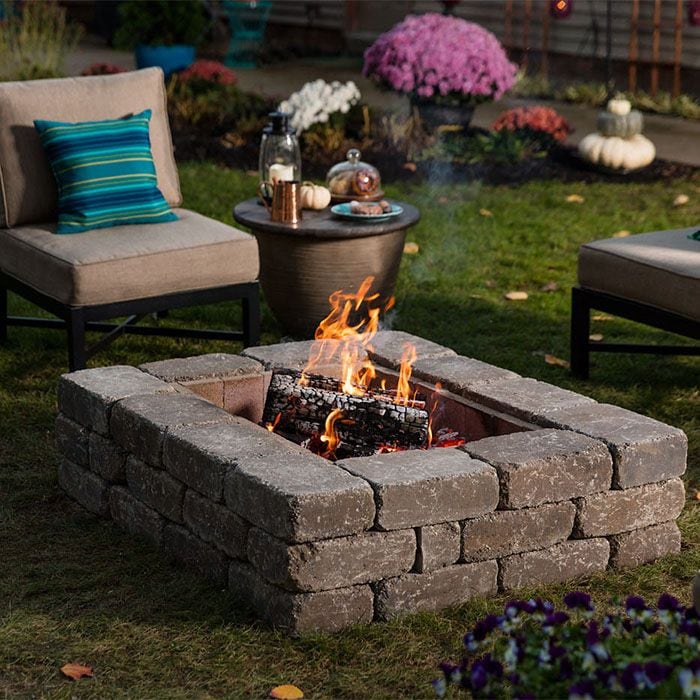
Add logs and kindling, and you’re ready for a pleasant evening by the fire.
DIY Fire Pit Ideas
To choose the right fire pit design and layout to suit your needs, think about how you’ll most often use your fire pit area. If you frequently host a lot of outdoor parties with many guests or want your pit to match an existing patio, consider building an in-ground fire pit with a paver surround.
If your fire pit will mostly be enjoyed by you and your family, or if you prefer a more rustic look, a modern fire pit built out of retaining wall blocks or a timesaving fire pit project kit may be ideal.
If a ring design is more your style, check out How to Build a Fire Pit Ring, which includes step-by-step instructions for a fire pit ring kit.
For more backyard ideas with a fire pit, read Fire Pit Inspiration to Transform Your Backyard.
Complete your area for gathering on cool evenings. Start by building a fire pit and then make it more comfortable and inviting with the right accessories. Patio chairs create a conversation area, and you can add outdoor end tables for drinks and snacks. Garden décor, such as statues and sculptures, will make the area more attractive, while string lights or wind chimes can help create the perfect mood.
Frequently Asked Questions
Here are the typical questions DIYers have around building a fire pit at home.
Is It Cheaper to Build Your Own Fire Pit?
In most cases, it’s cheaper to build a fire pit yourself if you already have all or most of the required tools. If you hire a contractor, you’ll have to pay for labor in addition to the costs of any materials.
How Do You Make a Simple Homemade Fire Pit?
The easiest way to build a fire pit yourself is to use a fire pit kit. This will eliminate a lot of the planning and design work.
What Do You Put in the Bottom of a DIY Fire Pit?
The best materials to put in the bottom of your fire pit are gravel, paver base or fire bricks.