
Tools and Materials
Tools
Product costs, availability and item numbers may vary online or by market.
Introduction to Hanging Drywall
Drywall is panels of pressed gypsum plaster between heavy paper. Drywall is also known as plasterboard, wallboard and gypsum board. Some people call it “Sheetrock,” but Sheetrock is a registered trademark of a company that produces drywall.
Drywall comes in three basic thicknesses:
- 5/8 inch is heaviest and the most soundproof
- 3/8 inch is best to cover existing walls
- 1/4 inch is the choice for curved walls and arches.
When hanging drywall, the goal is to create the fewest number of seams possible. This means working with the largest drywall panels and pieces you can handle safely during your Sheetrock installation.
Vertical joints in drywall are also called "butt joints."
Always leave a 1/2-inch gap at the floor. This allows for floor and wall expansion without cracking the drywall. It also helps prevents moisture wicking if the floor floods.
Wear work gloves, safety goggles and a dust mask when hanging drywall.
Prepare Your Room

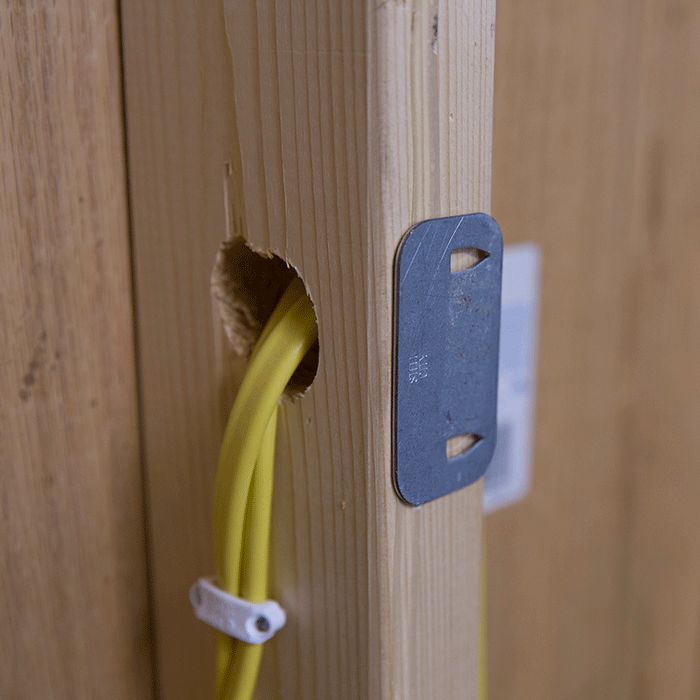
Cover electrical and plumbing lines with nail protector plates. This prevents accidental drilling or nailing into utility lines. Watch our Video: When Do I Use Nails vs. Screws?
Hang Drywall
Follow the next fifteen steps to hang and nail drywall.
Step 1: Apply Adhesive to the Studs

Starting with the top row, apply adhesive to the studs. A wall stud is the vertical frame that holds the wall structure in place. The adhesive helps prevent popped nail heads by helping to hold the drywall panel in place.
Step 2: Vertically Align Studs

Holding the first sheet horizontally across the ceiling and close to the corner, align both vertical sides with studs. Hammer in a few nails to hold it in place.
Make sure the nail heads are beneath the surface of the drywall. You will cover the nails with joint compound later.
Step 3: Measure, Cut and Smooth Second Drywall Panel

Measure the remaining space, adding 1/4 inch for easier installation. Mark and score the front side of the second drywall panel. Snap the front side (gypsum) and cut the paper backing with a knife; smooth rough edges with a rasp. A rasp is a rough file that scrapes away the edges of hard materials.
Step 4: Hang the Second Panel

Tack the second piece into place with ring drywall nails. Ring drywall nails are powerful fasteners characterized by rings around the nail to create more friction with the wood, holding it in place better than traditional nails.
Step 5: Mark the Studs

Make marks on the wall studs so you know where to drive the screws.
Step 6: Drive Screws Into Drywall

Drive screws through the drywall and into the wall studs, about 16 inches apart in the middle and about 8 inches along the vertical joints. Keep the screws 3/8 inch from the edge.
The screw heads should be just below the paper. You will cover them with joint compound later. Drywall drills are specially designed to make this happen every time.
Step 7: Score-Snap-Rasp

Measure and cut the height and width for the bottom row using the score-snap-rasp method above.
Step 8: Measure and Mark for Electrical Boxes

Mark electrical boxes on the bottom row of panels. To do this, measure from the bottom of the top panel to the top of the electrical box. Transfer the mark to the new piece of drywall.
Turn off electricity to the room before working around electrical outlets.
Step 9: Mark and Measure Again

Measure the height and width of the electrical box and create a pattern on the new piece of drywall. Use a drywall saw to cut out the rectangular pattern for the electrical box.
Test the tightness of the fit around the electrical box. If necessary, shave away a little more drywall. A too-snug fit may cause the drywall to crack and break.
Step 10: Tack Nails to Hold the Drywall in Place

Hold the panel into place using a foot lift. Keep it 1/2 inch off the floor and tack some nails in to hold it.
Step 11: Hang the Next Piece of Drywall

Hang the next piece and go back to drive all the screws into place.
Step 12: Cut Out Windows and Doors

To cut out windows and doors, hang the top row of drywall and make the cutout with a saw. Avoid creating a joint at the door or window corner. This will increase the odds of cracks later.
Step 13: Hang the Bottom Drywall Panel

Hang the bottom panel, avoiding seam creation at window corners, and make the cutout with a saw.
Step 14: Avoid Tight Fitting

For inside corners, don’t force the pieces tight together – this will cause crumbling and breakage later. Cut it to leave about 1/8 inch of wiggle room. You will fill the gap with joint compound later.
Step 15: Hang Panel at Corner
For outside corners, let the panel overhang the corner on one side. Hang the adjacent panel, touching the back side of the overhang, and secure it. Cut away the excess.
Step 16: Tape Drywall Seams

Using mesh tape – which hides seams more effectively than paper tape – cover the vertical joints, or butt joints, first, pressing it firmly into place with a drywall knife. Then cover the horizontal seams. Finally, cover the corners.
Joint Compound: First Coat
Follow these five steps to apply the first coat of joint compound.
The first coat doesn’t have to be perfect. Just don’t leave any excess behind.
Step 1: Apply and Feather Joint Compound

Following the same vertical, horizontal, corner pattern, apply pre-mixed joint compound over the mesh tape with a drywall knife. Feather the edges to manage excess compound.
Feathering is an application technique that increases the pressure and angle of the drywall knife as it moves towards the edge of the compound. This creates the thinnest possible layer of compound at the outer edges of the seams.
Step 2: Apply Joint Compound to Inside Corners

On the inside corners, apply joint compound to each side and crease paper tape along the centerline. Press it into place with your fingers. Without cutting the tape, run your knife carefully down one side and then the other to create a firm fit.
Step 3: Apply Joint Compound to Outside Corner

On the outside corners, apply a layer of compound to either side of the corner. Cut paper beading to fit the height of the wall and press it into place with your fingers. Run a drywall knife over the beading to ensure a tight fit and simultaneously remove excess compound.
Beading is available in a variety of materials, including metal, paper and vinyl.
Step 4: Apply Compound to Fasteners

Finally, using a drywall knife, coat the fasteners with a layer of compound.
Step 5: Allow Compound to Dry
Let the first coat dry 24 hours.
Joint Compound: Second Coat
The second coat of joint compound is sometimes called the fill coat.
Step 1: Apply Second Coat Over First Coat

Use a 6-inch drywall knife to cover the first coat of tape and joint compound about 3/16 inch thick on the vertical seams.
Step 2: Feather the Joint Compound

Use a 10-inch knife to feather the edges wide so that it blends with the wall, and then lightly run the knife over the middle. When you’re finished with the second coat, the compound should be about 10-12 inches wide.
Step 3: Feather the Compound at Inside Corners

For inside corners, use a 6-inch drywall knife to feather the compound along one side only. You’ll do the other side on the third coat.
Step 4: Apply Compound and Feather at Outside Corners

For outside corners, use a 10-inch knife to apply compound to both sides. Feather the second layer out past the first layer to blend the edges with the wall.
Step 5: Apply Compound Over Fasteners

Apply a second coat of compound over all fasteners.
Step 6: Allow Compound to Dry

Let the second coat dry 24 hours.
Joint Compound: Third Coat
The third coat is called the finish coat, which means you should leave no tool marks.
Step 1: Sand the Joints

Lightly sand the joints with 120-grit sandpaper. Watch our video: How Do I Use Sandpaper?
Wear safety goggles and a dust mask. Open windows and cover doorways with plastic to reduce the mess in other parts of the house.
Use a vacuum sander or wet sponge to reduce the amount of dust produced.
Step 2: Apply Joint Compound to Seams

Step 3: Check Vertical Seams

Check the vertical seams by holding a flat-edge trowel with the blade perpendicular to the wall to see how far you need to feather out the coats.
Step 4: Apply Compound to Inside Corner

Apply compound to the other side of the inside corner.
Step 5: If Needed, Apply Compound Over Fasteners

Cover the fasteners again, if needed.
Step 6: Allow Compound to Dry
Let the finish coat dry for 24 hours and lightly sand for a smooth finish.
Skim Coat
For a professional finish, apply a skim coat. A skim coat is a thin layer of joint compound or “mud” that camouflages any rough areas left after the final coat of compound.
Step 1: Mix the Skim Coat

Mix the skim coat according to the manufacturer’s instructions.
Step 2: Apply Compound

Using a paint roller, work in 4-foot sections to roll on a finish compound.
Step 3: Remove Excess Skim Coat

Immediately remove the excess with a 12-inch drywall knife.
Step 4: Let Dry and Sand

Let the skim coat dry for 24 hours, then lightly sand.
Prime and Paint
Now it's time for the finishing touches: priming and painting.
Step 1: Apply Primer/Sealer

Apply a drywall primer/sealer, and let dry.
Step 2: Apply Paint

Finish the job with a coat or two of interior paint.
Pro Tips for Installing Drywall

- Store drywall sheets properly. Lay the drywall panels flat on a clean surface to avoid damage. Before installing each sheet, carefully examine it for any imperfections.
- Cut drywall accurately and safely. Measure the spacing of the wall studs to determine the correct drywall length, then mark your cut lines. Score along the lines with a utility knife deep enough to cut through the surface and into the core. Snap the sheet along the scored line, and if necessary, cut through the back paper with the knife to achieve a smooth, clean edge.
- Use the right drywall tape. Check the manufacturer’s instructions to see what type of drywall tape is best for the drywall mud you’ve purchased.
- Pre-fill any gaps. Fill deep seams or gaps with mud before applying tape to avoid air pockets.
- Crease the tape around corners. Fold the drywall tape evenly before applying it to the insides of corners for a proper fit.
- Feather the edges when applying mud. Smooth and blend the edges of each mud layer to minimize the amount of excess that needs to be sanded away.
- Let mud dry fully. Allow each coat to dry completely before sanding or applying the next coat.
- Wipe your putty knife or drywall tool occasionally. This helps ensure a smooth application without drag, scratches or uneven texture.
Ready to Start Your Drywall Project?

If you’re planning for your next DIY drywall job, you’ll need the right tools and materials to achieve professional-quality results. Whether you’re simply patching a hole in existing drywall or working on a new build, here are some drywall-related products Lowe’s customers depend on.


